Thursday, 30 April 2009

Costly Enterprise Junk Mail

While I was reading a weekly staff news letter I thought: what is the productivity lost if all staff actually read this and all the other news letters and corporate emails each year?

I did the calculation: 13000 staff; 3300 words worth reading per week; 200 words per minute; 8 hours a day; and an average pay of $AU250/day.

If all staff read the corporate junk mail, it would costs $AU5.4M each year!

But not everyone reads them and some just skim them. So if only 50% were actually read, and if only half of those were completely read on average then it adds up to $AU1.4M — still a large number.

I also read from one source that the average reader only comprehends 60% of what they read. So why do we bother if only 15% of the information is getting through?

So, tell management to keep it small and publish less often.

But we all send vast quantities of emails and we craft huge project plans and reports and strategies and requirements specifications and business cases and ... so keep it short for all our sakes.

Was that too long?

Wednesday, 22 April 2009

Light Wells


There is some construction work taking place on and under the ramp at Sydney Terminal Station. The work is, I am told, to refurbish rooms under the ramp for the Railway fire department.

Work above these rooms on the ramp revealed Light Wells that had been covered for years - probably over 80 years. These Light Wells consist of a metal frame filled with blocks of coloured glass which allow light to pass through into the rear of the voids under the ramp.


Some are square and others round.


Unfortunately I was too slow to get photos from above before they were covered up.

The work included the removal of the road and foot-path surface, excavation, water-proofing of the ceiling to the Light Wells, and the replacement of the footpath and road surface.

The Light Wells were covered with concrete and once again hidden from view.


Old photos of the ramp don't seem to show the Light Wells so they have been dark for a long time.

Other photos can be found here.

Friday, 3 April 2009

Warrimoo has a new power station

Our photovoltaic solar panels and inverter was installed last week (March 27, 2009).

We eventually selected a 1.5kW, 9 panel system. Our roof faces North and is generally not shaded by trees.

A 2kW inverter was installed in the garage to convert the DC power into AC. The output of the inverter is connected to one of our three-phase power circuits.

The inverter (I am told) switches off during a blackout for safety reasons. Otherwise if there is enough power from the panels it supplies power to our house and any excess is 'pumped' into the grid to supply our neighbors.

The unit seems to start working even if there is just 20W available.

Our household electric energy consumption is about 6 kWh per day. So this system should generate enough energy, on average to supply most of our electricity requirements.

Currently in NSW the energy fed into the grid is purchased by the electricity retailer at the same rate that they charge us so, in theory, every kWh we generate will reduce our bill by about 17c. I believe that this will rise to over 20c in July 2009.

It is hoped that NSW will establish a higher feed-in rate as some other states have done in Australia. Most pay at least 44c per kWh for excess generated capacity. This is called a Net feed-in tariff. The ACT pays 50c for every kWh generated which is called a Gross feed-in tariff.

The metering has not been done yet so we have one meter that generally runs backwards and the digits also count down so, although the feed-in meter is not installed, we are benefiting from our excess generated energy - if they take it into account. Our existing meters will be replaced by a poly-phase power meter and an additional feed-in meter will be installed.


Sunday, 15 March 2009

Ubuntu 8.10 (Intrepid) on a MacBook Pro (4,1)

As the title suggests, I decided to get Ubuntu 8.10 working on my MacBook Pro.

My aim, for a long time, has been to get linux running well on a Mac.


I think that the Ubuntu Team have packaged a brilliant distribution that supports the MacBook Pro very well, but a few tweaks are required.

These mods are documented here.

The process is long and not suitable for beginers. I thought that these changes could be turned into a script that would work for most users that are dual/multi-booting their Mac.

The scripts can be found on a Ubuntu post that I just posted.

Tuesday, 3 March 2009

Dual boot Windows XP/linux fails to boot Windows XP

I had a problem: my dual-boot PC would boot into linux (Ubuntu) fine, but I could not boot into Windows XP.


The Windows boot process would stop after loading hpdskflt.sys (in my case) and then it would restart.

It turns out to be my fault: I changed the hard drive configuration in BIOS to SATA rather than IDE. Switching it back to 'SATA Native=Disable' in my case allows Windows XP to boot normally.

Other BIOSs are likely to have a similar setting such as SATA Mode=IDE or SATA or RAID etc.

A friend, who had the same problem, later found this site which explains the problem in detail.

Monday, 2 March 2009

Fixing a Dick Smith G7659 (DTR7100) Digital Set Top Box

I offered to have a look at a friends digital TV set top box that was faulty. It was a Dick Smith branded unit (G7659?) that appears to be a DTR7100 made by Pacific Satellite.


A web search suggested that there were problems with the power supply. I ignored this information at first. Instead I noticed that the power supply voltages were printed on the main board. I checked them to find that they were all working, but not quite close enough to the stated voltage. I then examined the power supply board more carefully. I noticed 3 failed capacitors next to a heat sink. I could tell that they were faulty because their tops were domed rather than flat.

I replaced them and the box now works fine.

Sunday, 25 January 2009

HP 2710 All-In-One Easter Egg

My HP 2710 is complaining about the ink cartridges. I have not fixed it but I did discover an Easter Egg.

Press the * and # buttons at the same time.
The enter 62637

The printer will begin to print a page of photos that, probably, are the HP staff that worked on the printer or it's software.

Wednesday, 21 January 2009

DIY Super-Efficient Fridge Uses 0.1 kWH a Day - Can it really be that good?

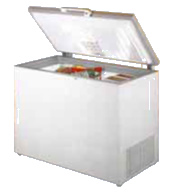
I was skeptical that a chest freezer could be modified to perform the function of a refrigerator and only use 0.1 kWh per day. The home site for this 2005? modification is here. now on Wayback here. Firstly, the chest freezer selected is a very efficient one to begin with. The VestFrost SE255 is rated as a 5-star, 247L chest freezer that has been tested to AS/NZS4474 to use 237kWh per year. AS/NZS4474, as I understand it, operates the freezer at -15C in an ambient temperature of 32C. It probably cost Tom around $1500. So this chest freezer uses, according to the standard test, 237/365 or 649Wh per day. It's dimensions are 1260 mm W x 850 mm H x 600 mm D displacing a volume of 643L. Allowing for a compressor void of 600 mm x 300 mm x 300 mm, the thickness of the sides and door must be about 135mm. So this freezer does have some serious insulation to keep it cool. The basic conversion is to add another thermostat device that keeps the inside of the freezer at somewhere above freezing so it becomes a fridge. Tom, the author, set the internal temperature to about 5.5C on average. Tom is of the opinion that this idea works because chest freezers have better insulation and that when the door is opened, cold air does not rush out. Tom is right, but the real reason that his fridge consumes so little power is due to the temperatures he is operating it in. Chest freezers, especially the SE255, do have thicker insulation. Vertical refrigerators do loose cold air when the door is opened. But if this chest freezer were to be stood on end so the cold air could drain away, the fridge would only use a small fraction of 1Wh of energy to cool the ambient air back down to 5.5C. If the freezer is empty and all the air is replaced then the freezer needs to cool it down by 12.5C in Tom's case. 247L of air weighs about 0.32 kg. The heat capacity of air is about 1000J/kg/K. So the fridge needs to remove 4000J to cool this air down to 5.5C. Now, if I am right with my physics, the electrical energy required to pump energy out of a fridge is: E = Heat * ( T.hot - T.cold ) / ( T.cold * M.eff ) If the motor efficiency (M.eff) is 90%, Heat is 4000 J, T.hot is 291.15K and T.cold is 278.65 K and the the electrical energy required is 199J or 55mWh (that is 55 milli-Watt hours) - a small amount. Others have noted this small amount also. Now, the warm air may cool a little upon entering the fridge and this cooled air may also drain away, but since the 'energy' lost is so low it makes little difference. The real reason for the low energy use is the operating temperatures: average ambient of 18C and internal temperature of 5.5C on average. By my calculations, and I am no expert here, the freezer would consume just 6.6% of the energy it does when tested to AS/NZS4474. So it should use 0.066 * 649 = 43Wh. Tom stated that the fridge used 103Wh on the first day and that 30% of this was during the stocking/re-arranging period. So my math does not seem to be too far out. What would happen if we operated an energy efficient vertical fridge at Tom's temperatures? Let's pick an Electrolux ERM4307. It is a 6 star 400L fridge (actually it is better than that but the star scale only goes to 6) that is tested to consume 250 kWh per year or 685 Wh per day when operated (closed) at 32C with in internal temperature of 3C. Its volume is about 887L. Again allowing 63L for the compressor, the insulation is probably about 120mm thick. By my calculations it would use just 18.4% of 685Wh which is 126Wh per day and the fridge is about 70% larger inside than the SE255. So the chest freezer is still better, but a good vertical fridge can use very little energy too in Tom's environment. Electrolux also make a vertical freezer. The EFM3607 which is tested to use 403kWh per year which is 1.1 kWh per day. When operated in Tom's environment it should use just 6.6% of 1.1kWh which is 72Wh per day. This fridge/freezer pair will set you back roughly $3600. So, to reduce your fridge/freezer running costs you need to start with an efficient fridge and freezer. Then keep them in a cool place with good ventilation. If you want to you can raise the internal set point to further reduce running costs - I would stay under 8C and definitely under 10C. To get an idea of the energy saving that you can make by changing the operating temperatures of your fridge or freezer, I have made this graph that hopefully makes it easier to get an approximate energy reduction factor: Select the inside temperature line, draw a line up from the ambient temperature axis to the internal temperature line and read off the energy factor (as a percentage). To use it, just multiply your fridge's daily/yearly energy consumption by this percentage.

Thursday, 15 January 2009

How-to Make a Near-Infrared (IR) Digital Camera

I read about Mark who modified a FujiFilm Digital Camera to make it work in the Near Infrared region. I had an old Canon PowerShot A200 so I decided to see if I could do the same.


The aim is to remove and possibly replace the IR filter within the camera. The IR filter blocks the infrared light so that, presumably, pictures look roughly the same as they do to the naked eye.

I began by removing all the external screws that hold the camera case together. Four from around the battery cover were longer than others.

Next I gently removed the back cover which I discovered is wired to the camera chassis by two flexible ribbon cables.


The connectors have a black plastic locking piece that you can see either side of the ribbon cable towards the bottom of the light coloured connector. I pushed these down about 1-2mm and the ribbon cable easily came out.


I gentle separated the front case from the chassis. It too is attached by a small ribbon cable but in this case the connector does not have a locking piece.

It does have a small plastic reinforcement strip that I gripped with needle pliers to remove the cable as the following video shows.


It may be possible to leave this cable in place if you don't want to remove it, but it will be more awkward to remove the lens module.

Now I removed the lens module.


Here is a picture of the image sensor with the lens removed.


The IR filter is located on the lens module, just under a rubber boot. The boot was affixed with a little adhesive, but it was easily separated from the module.


The IR filter is also glued to the lens module. I disassembled the module to remove it, but it would be much easier to just pry it out from the outside. A small knife or tiny screwdriver should work ok.

The problem with disassembling the lens module is that you can easily make the lens dirty and it has a number of parts including a spring that are fiddly to put back together.

This is what it should look like before and after re-assembly. Note how the small spring attaches to the lens.


The lens module has a gear that can be turned with your finger. As you turn it you should see the lens slowly move in or out. Do this to verify that the lens focus gears are working correctly.

Here I had two options: 1. replace the lens with a visible-light filter as Mark did or 2. leave the filter out altogether. I tried both methods. If replaced the camera is only good for IR photos. If removed, you can take regular photos but they will look a bit different. To take IR photos you can hold a visible-light filter over the lens - not ideal but a reasonable compromise if you don't plan to use it too often.

Now I just had to reverse the process and reassemble the camera. Try not to force it together. The pieces will fit together fairly easily once you find the magic initial orientation of each part.

And the result...

I only have one half-reasonable image of a Mac remote control. To the eye it is black, but to the modified camera it is clear as glass.

Tuesday, 13 January 2009

Reducing Fridge Energy Consumption - Now with Pictures!

For about 12 months our family has tried to reduce our gas and electricity energy consumption. We use gas for hot water, wood for heating and we have no air conditioner so our main electricity consumer was our fridge. I confirmed this by measuring the energy that the fridge used.

We have an old fridge. It is an upside-down model and at least 15 years old - a Westinghouse Silhouette 411L RB411B.

In our situation - on the lowest [power] setting - it consumes about 1360WHr per day which consists of a constant load of 50mA (12.5W) and about 165W when the compressor is running. The power factor for the motor appears to be about 0.66 - of course these figures are rough and really just provide me with a baseline (To measure the power and power factor I used a cheap energy meter that costs about $40). The compressor typically operated for 11 minutes in every 41 or about 27% of the time.

I began by focusing on the constant 12.5W. What is it? The fridge is not a smart fridge so why does it constantly consume 50mA? This adds up to 300WHr per day or about 22% of the total energy consumption.

This fridge has a cooling plate in the upper section where the milk and eggs are kept.


It seems that the design causes ice to build up on the plate which could, if not removed, reduce the efficiency of the fridge. To overcome this, a heating element was installed behind the plate to melt any ice when the compressor stops. The melted ice drips into a gutter and is drained to an evaporator above the motor.


So, I ripped it out. I could have just disconnected it, but I didn't.

Having removed the defrost element, I had to develop a plan to remove ice from the plate. I achieved this by placing the fridge on a timer which cut power for, initially, 3 hours from about 3AM. This didn't have a noticeable effect on the operating range of the fridge and it allowed enough time for the ice to melt.


In theory, the fridge should now consume about 1060WHrs - a big difference. But shouldn't it reduce the energy consumed by more than 12.5W because the heating energy must then be pumped out the next time the compressor runs? If the compressor is like an air-conditioner, then the cooling efficiency is about 2.5 which means that it should take 5W to remove the heat from the defrost element. Therefore the reduction should be more like 17-18W or 410-430WHr per day.

My records aren't the best, but I think the fridge now consumed 950WHr per day based on a duty cycle of 24%.

My next thought was to insulate the fridge. As I said, it is an old fridge and has the radiator elements on the outside and about 25mm from the back of the fridge. I placed a blanket between the radiator and the fridge and I draped a doona (light weight polyester blanket) over the sides of the fridge. This also had an effect. The on-time reduced to 9 minutes in 43 minutes or about 21%.

The result is an average energy consumption of 810WHr per day - down 40% from my unmodified fridge.

My current challenge is to see if I can do better by controlling when the fridge can operate. The idea is that thermostat is too sensitive and operates when the door is opened and the fridge looses it's cold air. My calculations suggest that the warmer air from the room doesn't take much energy to get down to normal fridge temperatures so by making the thermostat a secondary temperature controller I hope to reduce the energy consumption further. It also allows me to have two defrost periods during a day and to ensure that the fridge has plenty of time to adjust to post meal activity as warm foods and goods are placed back into the fridge.

Initial results are promising: without insulation the fridge is consuming about 800WHr per day, so with insulation it should be even lower. The fridge is operating between 4 and 9 degrees Celsius and typically between 5 and 8 degrees.