Showing posts with label howto. Show all posts

Tuesday, 8 March 2011

Howto Get Long Battery Life on a Nexus One

In case this is copied, go to the original site which should be http://philatwarrimoo.blogspot.com/2011/03/howto-get-long-battery-life-on-nexus.html

I would use my phone a lot (music, hotspot, not phone calls) and only get 15 - 18 hours from a fully charged battery.

I had read that some people got between 1 day and 1.5 days.

So, what is the upper limit? If you leave you phone in one spot and hardly touch it, how long will it run for?

The specs say 250/290 hours for 3G/2G.

To get this I assume you would need great signal levels, and virtually nothing running on the phone - in fact the phone would be the factory default.

But what could I get? I don't get great coverage at my place, especially inside where the signal is shielded by metal fly-screens, foil insulation, steel roof and two layers of brick - it is almost a Faraday cage.

I defaulted the phone. I didn't clear my SD card because I didn't want to.

I did make a few changes: I kept some applications that I do use often, and I disabled Picasa sync because I am in the middle of uploading lots of photos and that would distort the tests.


The big power consumers are believed by some to be the display, radio, GPS, WiFiBluetooth, and sync.


I have found that the main ones are the display and the radio (2G/3G).


In Australia the carriers all have GSM as well as either UMTS or HSDPA. My carrier only seems to have GSM and UMTS.


I decided to test what radio setting uses less energy. My options are GSM Auto (PRL), WCDMA Preferred, WCDMA Only and WiFi (for when I am at home). I don't want GSM only so I am not going to test that. I won't test Automatic either because I have no idea what it actually does.


  • GSM Auto (PRL) I believe prefers GSM rather than WCDMA, but it will switch to WCDMA if the signal is strong enough.
  • WCDMA Preferred is the opposite.
  • WCDMA Only is what it is.


When WiFi is on, I believe the 2G/3G radio switches off, so only the WiFi radio is on.


GPS will be left on (as per the default), as will sync, the default live wallpaper, widgets etc.

As I said earlier, Picasa sync will be off.


The Applications installed are:

4trak (since uninstalled)
adobe flash (since uninstalled)
anycutastrogoogle earth (since uninstalled)
espeakfunction express (since uninstalled)
gmailgoggleshotspot widgetlistenmapsmarketplugin launcher (i added this last night - since uninstalled)
realcalcringdroid (since uninstalled)
spareparts (since uninstalled)
terminal emulator (since uninstalled)wifi analyser (since uninstalled)

And this is what generally runs:

settingsgoogle servicesmapsgmail (regularly on and off)android keyboardandroid live wallpaper

The following Widgets are part of the default setup:

google searchpower controlyoutubeweather and newsmarket

I checked once and found the 107 MB used and 244 MB free.

I generally did not reboot between tests - perhaps I should have.

I ran the tests for different periods and only long enough to get a feeling for how long it would run for. 


The phone was always in the same place and was only moved to check how it was going. Usually I checked a few times for just a few seconds.

Test Results

WiFi On: 4.25 hours, 82% remaining. I'd expect it to go for 24 hours.

From the graph you can see that something changed for about 30 minutes that consumed a lot of energy (about 10%). This has resulted in the poor expected battery life.

The graph also shows the screen being turned on a few time and once for about 15 minutes - I don't recall doing this!


When the screen turns off or the phone sleeps, WiFi still runs for up to 15 minutes.


WiFi wakes up when the radio signal drops or changes.

I should re-do this test.


GSM Only (PRL): 9.2 hours, 90% remaining. I'd expect it to go for 92 hours.

Battery drain was fairly constant and seemed to increase when coverage was poorer (at the beginning and end of the test period).


The screen was also on for 20 minutes at the start of the test - I am sure that this did not happen.


WCDMA Only: 3.2 hours, 91% remaining. I'd expect it to go for 36 hours.

Again something happened for about 40 minutes causing a drain of about 5% of the battery.


WCDMA Preferred: 2.25 hours, 92% remaining. I'd expect it to go for 28 hours.


The phone seems to wake up when there is poor or changing signal.


The observation to make is that there is a big difference in the expected battery life depending on which radio setting you choose. For me, GSM Only (PRL) would provide the longest battery life at home, and probably where the 3G signal is poor.

WiFi was the poorest, but at home it will generally be on the dock and charging.

For those that have good 3G coverage, the WCDMA Only option will probably serve you well.


Custom Test

I then decided to turn off the widgets, use a black live wallpaper that I made a while ago, select GSM Auto (PRL) and turn WiFi on.

WiFi On, GSM Auto (PRL), most widgets off, black live wallpaper: 4.3 hours, 92% remaining. I'd expect it to go for 54 hours.

Only the Power Control widget was running.

Wifi seems to stay on for about 15 minutes then sleeps. It wakes up when you turn the screen on.

The WiFi Sleep Policy is Never when plugged in so this means that it will sleep if it is not plugged in.


WiFi Power Hungry Bug

Some have reported that WiFi on anything but the default sleep policy setting causes Android OS to run at high levels. Normally it sits at 2%-ish, but when the fault occurs it runs at 40%, 50% and even higher - usually higher than the display.

Some get relief using the WiFi sleep policy: 'Never', and others find this to be the cause. By this I suspect they mean that if the setting is changed from the default (to 'Never', for example) something bad happens when you switch back to the default setting. This is my experience.

In one of my tests I used the WiFi sleep policy: 'When screen turns off' and Android OS sky-rocketed. I recommend you keep the default (Never when plugged in) until this is fixed.


Summary

1. When WiFi turns on, it stays on for 15 minutes.
2. For me, GSM Auto (PRL) is better than WCDMA Preferred or WCDMA Only.
3, The graph seems to show the screen on when it isn't.
4. The phone seems to wake up on signal strength change, or this could be base station changes.
5. If WiFi is asleep and the radio looses signal, WiFi will wake up.
6. The default Nexus One setup with all the widgets and live wallpaper seems gentle on the battery.

Update


I have used my phone with minimal apps installed, my special black wallpaper and very few gadgets. I have been getting at least 12 hours of use before the battery reaches 50%, so this is about 1 day.


I'll try to keep some records from now on to quantify this.


Monday, 28 February 2011

Howto Sting Android Nexus One Droid Gingerbread

In case this is copied, go to the original site which should be http://philatwarrimoo.blogspot.com/2011/02/howto-sting-android-nexus-one-droid.html

Recently a blog of mine was copied and added to another site. I assume it was by a robot so I want to see if this gets copied as well.

I have added the important bait words such as:

1. Howto
2. Android
3. Nexus One
4. Droid
5. Gingerbread

But this time I have added a link on the top to this blog to see how many people get here from there.

An image to begin with...


So far, the tally is obviously zero since I am just writing it and it has not been saved or published - really I am just filling the space to make it look big enough for the bot to grab - assuming that it has some size range that it is interested in.

Another unrelated image:


An a link to the site - they might appreciate it.

http://www.premium-joomlathemes.com/jd-droid-drupal-template-drupal-hotel-theme-for-lodging-accommodation-with-t3-framework.html

Now for some real nonsense:

This nonsense comes from a pseudo text generator called Lorem Ipsum.

You can find more details here: http://www.lipsum.com/

Please note: I have copied text from another site and provided a link to it with thanks. Some could learn from this example - not that it is a very good example.

A sample nonsense would help:

The standard Lorem Ipsum passage, used since the 1500s

"Lorem ipsum dolor sit amet, consectetur adipisicing elit, sed do eiusmod tempor incididunt ut labore et dolore magna aliqua. Ut enim ad minim veniam, quis nostrud exercitation ullamco laboris nisi ut aliquip ex ea commodo consequat. Duis aute irure dolor in reprehenderit in voluptate velit esse cillum dolore eu fugiat nulla pariatur. Excepteur sint occaecat cupidatat non proident, sunt in culpa qui officia deserunt mollit anim id est laborum."
Section 1.10.32 of "de Finibus Bonorum et Malorum", written by Cicero in 45 BC

"Sed ut perspiciatis unde omnis iste natus error sit voluptatem accusantium doloremque laudantium, totam rem aperiam, eaque ipsa quae ab illo inventore veritatis et quasi architecto beatae vitae dicta sunt explicabo. Nemo enim ipsam voluptatem quia voluptas sit aspernatur aut odit aut fugit, sed quia consequuntur magni dolores eos qui ratione voluptatem sequi nesciunt. Neque porro quisquam est, qui dolorem ipsum quia dolor sit amet, consectetur, adipisci velit, sed quia non numquam eius modi tempora incidunt ut labore et dolore magnam aliquam quaerat voluptatem. Ut enim ad minima veniam, quis nostrum exercitationem ullam corporis suscipit laboriosam, nisi ut aliquid ex ea commodi consequatur? Quis autem vel eum iure reprehenderit qui in ea voluptate velit esse quam nihil molestiae consequatur, vel illum qui dolorem eum fugiat quo voluptas nulla pariatur?"

Saturday, 26 February 2011

Howto Vodafone UK Nexus One to Gingerbread

In case this is copied, go to the original site which should be http://philatwarrimoo.blogspot.com/2011/02/howto-vodafone-uk-nexus-one-to.html


A friend made this great guide.


http://ossadmin.wordpress.com/2011/02/26/goodbye-vodafone-uk-nexus-one-rom/


I have to same phone with the same Vodafone UK ROM and I kept my log of what I did in case it might help others.


All of the screenshots are from the above blog.


Notes:


All the following stages are similar. The first is a little different, but the others are virtually the same - the differences being the URL to get the file, and the name of the file to copy to your phone's SD card.


Sometimes the phone will automatically reboot after the installation of the update.zip file - other times you will need to manually reboot it by selecting the right menu item. All of this should be obvious.


Just follow these steps in order. If you get lost or miss a step, just start again (I did that a few times).


MD5


I do not know the original MD5 sums of the files listed below, but so you can verify that you get the same file as I did, here are my MD5 sums:

2854b06b22b9.signed-passion-FRG83G-from-FRG83D.2854b06b.zip
23a17e5f70d794858e0fe7aba308c3d7

766a101ae02c.signed-passion-ota-60505.766a101a.zip
1b3a95a92b0fd319f0e730b80e1e03ac

81304b2de707.signed-passion-GRI40-from-FRG83G.81304b2d.zip
706a4631271b6ee2c819ab548394b71e

ecb21b752065.signed-passion-FRG83D-from-FRG83.ecb21b75.zip
0fb26549e9de782e86e665a68693c50a

Passion_Google_WWE_2.16.1700.1_FRG33_MFG_Shipment_ROM.zip
3bcdbb83a4b951f813ca88771d69894d

passimg.zip (the file extracted from the file above)
d90635c2d269c6a26f77ae1a681e5424


Stage 1: Revert to Android 2.2


1. Get http://shipped-roms.com/download.php?category=android&model=Passion%20(Nexus%20One)&file=Passion_Google_WWE_2.16.1700.1_FRG33_MFG_Shipment_ROM.zip

2. Extract PASSIMG_Passion_Google_WWE_2.16.1700.1_FRG33_release_signed.zip
3. Rename to passimg.zip
4. Connect a USB cable to your computer and turn on USB storage
5. From your computer, copy passimp.zip to the root directory of your SD card
6. Eject USB device phone from your computer
7. Turn off USB storage
8. Power off the phone using the Power button (POWER) - like you normally would do
9. Hold down the Volume Down button (VOL DOWN) and keep it held down
10. Press and release (POWER)
11. When you see the white screen you can release (VOL DOWN)

A blue progress bar will be shown as it loads passimg.zip

12. After a while it will ask: 'Do you want to start update?' Press the Volume Up button (VOL UP) to say yes

The update will take a while. Progress is shown with various coloured progress bars

13. When done it will ask: 'Do you want to reboot device?' Press (VOL UP) to say yes

The phone will reboot

14. Disconnect the USB cable

The phone will say 'Welcome to Nexus One'. You don't want to do anything here so for me I skipped the setup like this:

15. Touch the screen
16. Tap the Skip button
17. Tap the Skip button
18. Tap Next button

Now, you can check to see if it all worked:

19. Find and launch the Settings app
20. Goto About phone

You should see the following:
Android Version: 2.2 Baseband Version: 32.41.00.32U_5.08.00.04 Kernel Version: 2.6.32.9-27237-gbe746fb android-build@apa26 #1 Build Number: FRG33

Stage 2: Upgrade to 2.2.1

1. Reconnect USB cable
2. Turn on USB storage
3. From your computer, delete passimg.zip from the SD card
5. Copy 766a101ae02c.signed-passion-ota-60505.766a101a.zip to the SD card
6. Rename it to update.zip
7. Eject the USB device phone from your computer
8. Turn off USB storage
9. Power off the phone
10. Hold down the Volume Down button (VOL DOWN) and keep it held down
11. Press and release (POWER)
12. When you see the white screen you can release (VOL DOWN)

It will quickly do something and then present 4 options


13. Press (VOL DOWN) to select the RECOVERY option
14. Press (POWER) to select RECOVERY

The phone will restart into a black ! screen


15. Press and hold (POWER)
16. Tap (VOL UP)
17. When you get a black screen you can release (POWER)


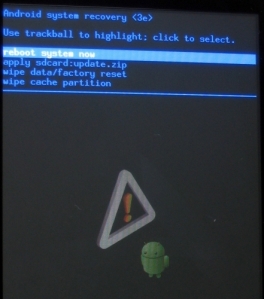
18. Use trackball to highlight 'apply sdcard:update.zip'
19. Click the trackball to select this

The installation will start. Progress is shown by an orange progress bar

The phone will eventually reboot

20. Disconnect usb cable

21. Goto About phone

You should see the following:
Android Version: 2.2.1Baseband Version: 32.36.00.28U_4.06.00.12_7 Kernel Version: 2.6.32.9-27240-gbca5320 android-build@apa26 #1 Build Number: FRG83

Stage 3: FRG83 to FRG83D


1. Reconnect USB cable
2. Turn on USB storage
3. From your computer, delete update.zip from the SD card
5. Copy ecb21b752065.signed-passion-FRG83D-from-FRG83.ecb21b75.zip to the SD card
6. Rename to update.zip
7. Eject the USB device phone from your computer
8. Turn off USB storage
9. Power off phone
10. Hold down the Volume Down button (VOL DOWN) and keep it held down
11. Press and release (POWER)
12. When you see the white screen you can release (VOL DOWN)

It will quickly do something and then present 4 options


13. Press (VOL DOWN) to select the RECOVERY option
14. Press (POWER) to select RECOVERY

The phone will restart into a black ! screen


15. Press and hold (POWER)
16. Tap (VOL UP)
17. When you get a black screen you can release (POWER)


18. Use trackball to highlight 'apply sdcard:update.zip'
19. Click the trackball to select this

The installation will start - progress is shown by an orange progress bar

The phone will eventually reboot or you need to select REBOOT

20. Disconnect usb cable

21. Goto About phone

You should see the following:

Android Version: 2.2.1Baseband Version: 32.36.00.28U_4.06.00.12_7 Kernel Version: 2.6.32.9-27240-gbca5320 android-build@apa26 #1 Build Number: FRG83D

Stage 4: Upgrade to 2.2.2 and FRG83G

1. Reconnect USB cable
2. Turn on USB storage
3. From your computer, delete update.zip from the SD card
5. Copy 2854b06b22b9.signed-passion-FRG83G-from-FRG83D.2854b06b.zip to the SD card
6. Rename to update.zip
7. Eject the USB device phone from your computer
8. Turn off USB storage
9. Power off phone
10. Hold down the Volume Down button (VOL DOWN) and keep it held down
11. Press and release (POWER)
12. When you see the white screen you can release (VOL DOWN)

It will quickly do something and then present 4 options


13. Press (VOL DOWN) to select the RECOVERY option
14. Press (POWER) to select RECOVERY

The phone will restart into a black ! screen


15. Press and hold (POWER)
16. Tap (VOL UP)
17. When you get a black screen you can release (POWER)


18. Use trackball to highlight 'apply sdcard:update.zip'
19. Click the trackball to select this

The installation will start - progress is shown by an orange progress bar

The phone will eventually reboot or you need to select REBOOT

20. Disconnect usb cable

21. Goto About phone

You should see the following:
Android Version: 2.2.2 Baseband Version: 32.36.00.28U_4.06.00.12_7 Kernel Version: 2.6.32.9-27240-gbca5320 android-build@apa26 #1 Build Number: FRG83G

Stage 5: Gingerbread

1. Reconnect USB cable
2. Turn on USB storage
3. From your computer, delete update.zip from the SD card
5. Copy 81304b2de707.signed-passion-GRI40-from-FRG83G.81304b2d.zip
6. Rename to update.zip
7. Eject the USB device phone from your computer
8. Turn off USB storage
9. Power off phone
10. Hold down the Volume Down button (VOL DOWN) and keep it held down
11. Press and release (POWER)
12. When you see the white screen you can release (VOL DOWN)

It will quickly do something and then present 4 options


13. Press (VOL DOWN) to select the RECOVERY option
14. Press (POWER) to select RECOVERY

The phone will restart into a black ! screen


15. Press and hold (POWER)
16. Tap (VOL UP)
17. When you get a black screen you can release (POWER)


18. Use trackball to highlight 'apply sdcard:update.zip'
19. Click the trackball to select this

The installation will start - progress is shown by an orange progress bar

The phone will eventually reboot or you need to select REBOOT

20. Disconnect usb cable

21. Goto About phone

You should see the following:
Android Version: 2.3.3 Baseband Version: 32.41.00.32U_5.08.00.04 Kernel Version: 2.6.35.7-59423-g08607d74 android-build@apa28 #1 Build Number: GRI40

Stage 6: Delete phone data (but not your SD card)

NB: I'm not sure this is required.

1. Goto Settings - Privacy - Factory data reset

If you want to keep your SD card data, DO NOT select 'Erase SD card'


Stage 7: Login and restore your apps

Once you enter your Google account details, your Google apps and settings should be restored. Your other apps will also be restored but y.our data will not be restored - use your backup

Any app not installed from the market will need to be manually restored.

I may have interrupted the restoration process by switching to a different WiFi Access Point - you probably should not do that.