Press the * and # buttons at the same time.
The enter 62637
The printer will begin to print a page of photos that, probably, are the HP staff that worked on the printer or it's software.


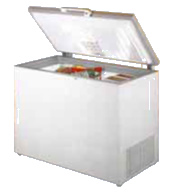 Firstly, the chest freezer selected is a very efficient one to begin with. The VestFrost SE255 is rated as a 5-star, 247L chest freezer that has been tested to AS/NZS4474 to use 237kWh per year. AS/NZS4474, as I understand it, operates the freezer at -15C in an ambient temperature of 32C. It probably cost Tom around $1500.
So this chest freezer uses, according to the standard test, 237/365 or 649Wh per day. It's dimensions are 1260 mm W x 850 mm H x 600 mm D displacing a volume of 643L. Allowing for a compressor void of 600 mm x 300 mm x 300 mm, the thickness of the sides and door must be about 135mm. So this freezer does have some serious insulation to keep it cool.
The basic conversion is to add another thermostat device that keeps the inside of the freezer at somewhere above freezing so it becomes a fridge. Tom, the author, set the internal temperature to about 5.5C on average.
Tom is of the opinion that this idea works because chest freezers have better insulation and that when the door is opened, cold air does not rush out. Tom is right, but the real reason that his fridge consumes so little power is due to the temperatures he is operating it in.
Chest freezers, especially the SE255, do have thicker insulation.
Vertical refrigerators do loose cold air when the door is opened. But if this chest freezer were to be stood on end so the cold air could drain away, the fridge would only use a small fraction of 1Wh of energy to cool the ambient air back down to 5.5C.
If the freezer is empty and all the air is replaced then the freezer needs to cool it down by 12.5C in Tom's case. 247L of air weighs about 0.32 kg. The heat capacity of air is about 1000J/kg/K. So the fridge needs to remove 4000J to cool this air down to 5.5C.
Now, if I am right with my physics, the electrical energy required to pump energy out of a fridge is:
E = Heat * ( T.hot - T.cold ) / ( T.cold * M.eff )
If the motor efficiency (M.eff) is 90%, Heat is 4000 J, T.hot is 291.15K and T.cold is 278.65 K and the the electrical energy required is 199J or 55mWh (that is 55 milli-Watt hours) - a small amount.
Others have noted this small amount also.
Now, the warm air may cool a little upon entering the fridge and this cooled air may also drain away, but since the 'energy' lost is so low it makes little difference.
The real reason for the low energy use is the operating temperatures: average ambient of 18C and internal temperature of 5.5C on average.
By my calculations, and I am no expert here, the freezer would consume just 6.6% of the energy it does when tested to AS/NZS4474.
So it should use 0.066 * 649 = 43Wh. Tom stated that the fridge used 103Wh on the first day and that 30% of this was during the stocking/re-arranging period. So my math does not seem to be too far out.
What would happen if we operated an energy efficient vertical fridge at Tom's temperatures?
Let's pick an Electrolux ERM4307. It is a 6 star 400L fridge (actually it is better than that but the star scale only goes to 6) that is tested to consume 250 kWh per year or 685 Wh per day when operated (closed) at 32C with in internal temperature of 3C. Its volume is about 887L.
Again allowing 63L for the compressor, the insulation is probably about 120mm thick.
By my calculations it would use just 18.4% of 685Wh which is 126Wh per day and the fridge is about 70% larger inside than the SE255.
So the chest freezer is still better, but a good vertical fridge can use very little energy too in Tom's environment.
Electrolux also make a vertical freezer. The EFM3607 which is tested to use 403kWh per year which is 1.1 kWh per day. When operated in Tom's environment it should use just 6.6% of 1.1kWh which is 72Wh per day.
This fridge/freezer pair will set you back roughly $3600.
So, to reduce your fridge/freezer running costs you need to start with an efficient fridge and freezer. Then keep them in a cool place with good ventilation. If you want to you can raise the internal set point to further reduce running costs - I would stay under 8C and definitely under 10C.
To get an idea of the energy saving that you can make by changing the operating temperatures of your fridge or freezer, I have made this graph that hopefully makes it easier to get an approximate energy reduction factor:
Select the inside temperature line, draw a line up from the ambient temperature axis to the internal temperature line and read off the energy factor (as a percentage). To use it, just multiply your fridge's daily/yearly energy consumption by this percentage.
Firstly, the chest freezer selected is a very efficient one to begin with. The VestFrost SE255 is rated as a 5-star, 247L chest freezer that has been tested to AS/NZS4474 to use 237kWh per year. AS/NZS4474, as I understand it, operates the freezer at -15C in an ambient temperature of 32C. It probably cost Tom around $1500.
So this chest freezer uses, according to the standard test, 237/365 or 649Wh per day. It's dimensions are 1260 mm W x 850 mm H x 600 mm D displacing a volume of 643L. Allowing for a compressor void of 600 mm x 300 mm x 300 mm, the thickness of the sides and door must be about 135mm. So this freezer does have some serious insulation to keep it cool.
The basic conversion is to add another thermostat device that keeps the inside of the freezer at somewhere above freezing so it becomes a fridge. Tom, the author, set the internal temperature to about 5.5C on average.
Tom is of the opinion that this idea works because chest freezers have better insulation and that when the door is opened, cold air does not rush out. Tom is right, but the real reason that his fridge consumes so little power is due to the temperatures he is operating it in.
Chest freezers, especially the SE255, do have thicker insulation.
Vertical refrigerators do loose cold air when the door is opened. But if this chest freezer were to be stood on end so the cold air could drain away, the fridge would only use a small fraction of 1Wh of energy to cool the ambient air back down to 5.5C.
If the freezer is empty and all the air is replaced then the freezer needs to cool it down by 12.5C in Tom's case. 247L of air weighs about 0.32 kg. The heat capacity of air is about 1000J/kg/K. So the fridge needs to remove 4000J to cool this air down to 5.5C.
Now, if I am right with my physics, the electrical energy required to pump energy out of a fridge is:
E = Heat * ( T.hot - T.cold ) / ( T.cold * M.eff )
If the motor efficiency (M.eff) is 90%, Heat is 4000 J, T.hot is 291.15K and T.cold is 278.65 K and the the electrical energy required is 199J or 55mWh (that is 55 milli-Watt hours) - a small amount.
Others have noted this small amount also.
Now, the warm air may cool a little upon entering the fridge and this cooled air may also drain away, but since the 'energy' lost is so low it makes little difference.
The real reason for the low energy use is the operating temperatures: average ambient of 18C and internal temperature of 5.5C on average.
By my calculations, and I am no expert here, the freezer would consume just 6.6% of the energy it does when tested to AS/NZS4474.
So it should use 0.066 * 649 = 43Wh. Tom stated that the fridge used 103Wh on the first day and that 30% of this was during the stocking/re-arranging period. So my math does not seem to be too far out.
What would happen if we operated an energy efficient vertical fridge at Tom's temperatures?
Let's pick an Electrolux ERM4307. It is a 6 star 400L fridge (actually it is better than that but the star scale only goes to 6) that is tested to consume 250 kWh per year or 685 Wh per day when operated (closed) at 32C with in internal temperature of 3C. Its volume is about 887L.
Again allowing 63L for the compressor, the insulation is probably about 120mm thick.
By my calculations it would use just 18.4% of 685Wh which is 126Wh per day and the fridge is about 70% larger inside than the SE255.
So the chest freezer is still better, but a good vertical fridge can use very little energy too in Tom's environment.
Electrolux also make a vertical freezer. The EFM3607 which is tested to use 403kWh per year which is 1.1 kWh per day. When operated in Tom's environment it should use just 6.6% of 1.1kWh which is 72Wh per day.
This fridge/freezer pair will set you back roughly $3600.
So, to reduce your fridge/freezer running costs you need to start with an efficient fridge and freezer. Then keep them in a cool place with good ventilation. If you want to you can raise the internal set point to further reduce running costs - I would stay under 8C and definitely under 10C.
To get an idea of the energy saving that you can make by changing the operating temperatures of your fridge or freezer, I have made this graph that hopefully makes it easier to get an approximate energy reduction factor:
Select the inside temperature line, draw a line up from the ambient temperature axis to the internal temperature line and read off the energy factor (as a percentage). To use it, just multiply your fridge's daily/yearly energy consumption by this percentage.


 The connectors have a black plastic locking piece that you can see either side of the ribbon cable towards the bottom of the light coloured connector. I pushed these down about 1-2mm and the ribbon cable easily came out.
 It does have a small plastic reinforcement strip that I gripped with needle pliers to remove the cable as the following video shows.


 Here I had two options: 1. replace the lens with a visible-light filter as Mark did or 2. leave the filter out altogether. I tried both methods. If replaced the camera is only good for IR photos. If removed, you can take regular photos but they will look a bit different. To take IR photos you can hold a visible-light filter over the lens - not ideal but a reasonable compromise if you don't plan to use it too often.
 For about 12 months our family has tried to reduce our gas and electricity energy consumption. We use gas for hot water, wood for heating and we have no air conditioner so our main electricity consumer was our fridge. I confirmed this by measuring the energy that the fridge used.
 is it? The fridge is not a smart fridge so why does it constantly consume 50mA? This adds up to 300WHr per day or about 22% of the total energy consumption.


 be interested in the design.
