Monday, 28 February 2011

Howto Sting Android Nexus One Droid Gingerbread

In case this is copied, go to the original site which should be http://philatwarrimoo.blogspot.com/2011/02/howto-sting-android-nexus-one-droid.html

Recently a blog of mine was copied and added to another site. I assume it was by a robot so I want to see if this gets copied as well.

I have added the important bait words such as:

1. Howto
2. Android
3. Nexus One
4. Droid
5. Gingerbread

But this time I have added a link on the top to this blog to see how many people get here from there.

An image to begin with...


So far, the tally is obviously zero since I am just writing it and it has not been saved or published - really I am just filling the space to make it look big enough for the bot to grab - assuming that it has some size range that it is interested in.

Another unrelated image:


An a link to the site - they might appreciate it.

http://www.premium-joomlathemes.com/jd-droid-drupal-template-drupal-hotel-theme-for-lodging-accommodation-with-t3-framework.html

Now for some real nonsense:

This nonsense comes from a pseudo text generator called Lorem Ipsum.

You can find more details here: http://www.lipsum.com/

Please note: I have copied text from another site and provided a link to it with thanks. Some could learn from this example - not that it is a very good example.

A sample nonsense would help:

The standard Lorem Ipsum passage, used since the 1500s

"Lorem ipsum dolor sit amet, consectetur adipisicing elit, sed do eiusmod tempor incididunt ut labore et dolore magna aliqua. Ut enim ad minim veniam, quis nostrud exercitation ullamco laboris nisi ut aliquip ex ea commodo consequat. Duis aute irure dolor in reprehenderit in voluptate velit esse cillum dolore eu fugiat nulla pariatur. Excepteur sint occaecat cupidatat non proident, sunt in culpa qui officia deserunt mollit anim id est laborum."
Section 1.10.32 of "de Finibus Bonorum et Malorum", written by Cicero in 45 BC

"Sed ut perspiciatis unde omnis iste natus error sit voluptatem accusantium doloremque laudantium, totam rem aperiam, eaque ipsa quae ab illo inventore veritatis et quasi architecto beatae vitae dicta sunt explicabo. Nemo enim ipsam voluptatem quia voluptas sit aspernatur aut odit aut fugit, sed quia consequuntur magni dolores eos qui ratione voluptatem sequi nesciunt. Neque porro quisquam est, qui dolorem ipsum quia dolor sit amet, consectetur, adipisci velit, sed quia non numquam eius modi tempora incidunt ut labore et dolore magnam aliquam quaerat voluptatem. Ut enim ad minima veniam, quis nostrum exercitationem ullam corporis suscipit laboriosam, nisi ut aliquid ex ea commodi consequatur? Quis autem vel eum iure reprehenderit qui in ea voluptate velit esse quam nihil molestiae consequatur, vel illum qui dolorem eum fugiat quo voluptas nulla pariatur?"

Sunday, 27 February 2011

Another Virtualised OS-X Example

In case this is copied, go to the original site which should be http://philatwarrimoo.blogspot.com/2011/02/another-virtualised-os-x-example.html

To see if my first virtualised OS-X was a fluke, I'll have another go. This will just list the steps I take and there won't be much discussion.

>VBoxManage internalcommands listpartitions -rawdisk /dev/sda
Number Type StartCHS EndCHS Size (MiB) Start (Sect)
1 0xee 1023/254/63 1023/254/63 200 1
2 0xaf 1023/254/63 1023/254/63 119102 409640
4 0x83 1023/254/63 1023/254/63 11444 244330976
3 0xaf 1023/254/63 1023/254/63 23167 343011768

The OS-X partition I want is Number 2: type is 0xaf and the size is about right.

I have found my first fault: I created the vmdk file in VB 3.2.8. Under VB 4.0 the '-register' option is no longer used. VB 4.0 has a '-relative' option for Linux hosts that would make sense to use, but 'relative' and 'register' are too different for it to be a typo.

My source used '-register' so VB 4.0 must be different.

>VBoxManage internalcommands createrawvmdk -filename /home/phil/.VirtualBox/HardDisks/osxpart1.vmdk -rawdisk /dev/sda -partitions 2RAW host disk access VMDK file /home/phil/.VirtualBox/HardDisks/osxpart1.vmdk created successfully.

I should point out that the name of the vmdk file that I used is from the viewpoint of OS-X, not the actual partition number - use your own naming scheme.

The '-register' option adds the new vmdk file to the list of hard disks available - looks like I'll have to register manually somehow.

I added an entry in the VirtualBox.xml file for the new hard disk like this:
I got the UUID from the osxpart1.vmdk.xml file - I used the uuid.image number for the uuid attribute.

That did the trick.

I created a new VM, called it maxosxp1 and VirtualBox automatically selected Mac OS X - nice.

I told it to use the new osxpart1.vmdk file that I just created and left everything else as default for the time being.

I tried to run it, and it didn't work. But I have found that you need to do this to populate the XML or VBOX file to make the next steps easier.

Note: in VB 4.0, the file is now in VirtualBox VMs/(machine name)/(machine name).vbox. It is still an XML file so you can edit it with a text editor - but as before only when VirtualBox is not running.

To make it boot I need to add in the special Apple SMC key.

I added these to the ExtraData section:

<ExtraDataItem name="VBoxInternal2/EfiBootArgs" value=" "/><ExtraDataItem name="VBoxInternal2/EfiGopMode" value="4"/><ExtraDataItem name="VBoxInternal2/SmcDeviceKey" value="ourhardworkbythesewordsguardedpleasedontsteal(c)AppleComputerInc"/>

I then started the VM.

It was slow to boot, but it got there. As it was loading I could see VMWare and VirtualBox kernel extensions loading and I thought that it will not like that - running a VM manager in a VM.

It wanted me to identify my keyboard and that was it.

I logged in, hit (shift)-(right command)-F to enter fullscreen mode.

Apart from being slow and running warm, it looked like I was running OS-X on a PM rather than a VM.

To solves the high CPU load problem, just delete the right kernel extension.
sudo rm -fr /System/Library/Extensions/AppleIntelCPUPowerManagement.kext
I haven't done that yet as I might want to boot into this partition sometime soon to tidy it up.


So, no fluke.

Saturday, 26 February 2011

Howto Vodafone UK Nexus One to Gingerbread

In case this is copied, go to the original site which should be http://philatwarrimoo.blogspot.com/2011/02/howto-vodafone-uk-nexus-one-to.html


A friend made this great guide.


http://ossadmin.wordpress.com/2011/02/26/goodbye-vodafone-uk-nexus-one-rom/


I have to same phone with the same Vodafone UK ROM and I kept my log of what I did in case it might help others.


All of the screenshots are from the above blog.


Notes:


All the following stages are similar. The first is a little different, but the others are virtually the same - the differences being the URL to get the file, and the name of the file to copy to your phone's SD card.


Sometimes the phone will automatically reboot after the installation of the update.zip file - other times you will need to manually reboot it by selecting the right menu item. All of this should be obvious.


Just follow these steps in order. If you get lost or miss a step, just start again (I did that a few times).


MD5


I do not know the original MD5 sums of the files listed below, but so you can verify that you get the same file as I did, here are my MD5 sums:

2854b06b22b9.signed-passion-FRG83G-from-FRG83D.2854b06b.zip
23a17e5f70d794858e0fe7aba308c3d7

766a101ae02c.signed-passion-ota-60505.766a101a.zip
1b3a95a92b0fd319f0e730b80e1e03ac

81304b2de707.signed-passion-GRI40-from-FRG83G.81304b2d.zip
706a4631271b6ee2c819ab548394b71e

ecb21b752065.signed-passion-FRG83D-from-FRG83.ecb21b75.zip
0fb26549e9de782e86e665a68693c50a

Passion_Google_WWE_2.16.1700.1_FRG33_MFG_Shipment_ROM.zip
3bcdbb83a4b951f813ca88771d69894d

passimg.zip (the file extracted from the file above)
d90635c2d269c6a26f77ae1a681e5424


Stage 1: Revert to Android 2.2


1. Get http://shipped-roms.com/download.php?category=android&model=Passion%20(Nexus%20One)&file=Passion_Google_WWE_2.16.1700.1_FRG33_MFG_Shipment_ROM.zip

2. Extract PASSIMG_Passion_Google_WWE_2.16.1700.1_FRG33_release_signed.zip
3. Rename to passimg.zip
4. Connect a USB cable to your computer and turn on USB storage
5. From your computer, copy passimp.zip to the root directory of your SD card
6. Eject USB device phone from your computer
7. Turn off USB storage
8. Power off the phone using the Power button (POWER) - like you normally would do
9. Hold down the Volume Down button (VOL DOWN) and keep it held down
10. Press and release (POWER)
11. When you see the white screen you can release (VOL DOWN)

A blue progress bar will be shown as it loads passimg.zip

12. After a while it will ask: 'Do you want to start update?' Press the Volume Up button (VOL UP) to say yes

The update will take a while. Progress is shown with various coloured progress bars

13. When done it will ask: 'Do you want to reboot device?' Press (VOL UP) to say yes

The phone will reboot

14. Disconnect the USB cable

The phone will say 'Welcome to Nexus One'. You don't want to do anything here so for me I skipped the setup like this:

15. Touch the screen
16. Tap the Skip button
17. Tap the Skip button
18. Tap Next button

Now, you can check to see if it all worked:

19. Find and launch the Settings app
20. Goto About phone

You should see the following:
Android Version: 2.2 Baseband Version: 32.41.00.32U_5.08.00.04 Kernel Version: 2.6.32.9-27237-gbe746fb android-build@apa26 #1 Build Number: FRG33

Stage 2: Upgrade to 2.2.1

1. Reconnect USB cable
2. Turn on USB storage
3. From your computer, delete passimg.zip from the SD card
5. Copy 766a101ae02c.signed-passion-ota-60505.766a101a.zip to the SD card
6. Rename it to update.zip
7. Eject the USB device phone from your computer
8. Turn off USB storage
9. Power off the phone
10. Hold down the Volume Down button (VOL DOWN) and keep it held down
11. Press and release (POWER)
12. When you see the white screen you can release (VOL DOWN)

It will quickly do something and then present 4 options


13. Press (VOL DOWN) to select the RECOVERY option
14. Press (POWER) to select RECOVERY

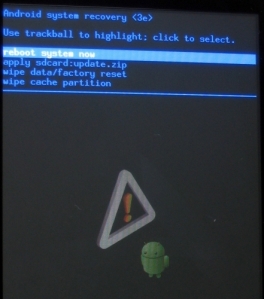
The phone will restart into a black ! screen


15. Press and hold (POWER)
16. Tap (VOL UP)
17. When you get a black screen you can release (POWER)


18. Use trackball to highlight 'apply sdcard:update.zip'
19. Click the trackball to select this

The installation will start. Progress is shown by an orange progress bar

The phone will eventually reboot

20. Disconnect usb cable

21. Goto About phone

You should see the following:
Android Version: 2.2.1Baseband Version: 32.36.00.28U_4.06.00.12_7 Kernel Version: 2.6.32.9-27240-gbca5320 android-build@apa26 #1 Build Number: FRG83

Stage 3: FRG83 to FRG83D


1. Reconnect USB cable
2. Turn on USB storage
3. From your computer, delete update.zip from the SD card
5. Copy ecb21b752065.signed-passion-FRG83D-from-FRG83.ecb21b75.zip to the SD card
6. Rename to update.zip
7. Eject the USB device phone from your computer
8. Turn off USB storage
9. Power off phone
10. Hold down the Volume Down button (VOL DOWN) and keep it held down
11. Press and release (POWER)
12. When you see the white screen you can release (VOL DOWN)

It will quickly do something and then present 4 options


13. Press (VOL DOWN) to select the RECOVERY option
14. Press (POWER) to select RECOVERY

The phone will restart into a black ! screen


15. Press and hold (POWER)
16. Tap (VOL UP)
17. When you get a black screen you can release (POWER)


18. Use trackball to highlight 'apply sdcard:update.zip'
19. Click the trackball to select this

The installation will start - progress is shown by an orange progress bar

The phone will eventually reboot or you need to select REBOOT

20. Disconnect usb cable

21. Goto About phone

You should see the following:

Android Version: 2.2.1Baseband Version: 32.36.00.28U_4.06.00.12_7 Kernel Version: 2.6.32.9-27240-gbca5320 android-build@apa26 #1 Build Number: FRG83D

Stage 4: Upgrade to 2.2.2 and FRG83G

1. Reconnect USB cable
2. Turn on USB storage
3. From your computer, delete update.zip from the SD card
5. Copy 2854b06b22b9.signed-passion-FRG83G-from-FRG83D.2854b06b.zip to the SD card
6. Rename to update.zip
7. Eject the USB device phone from your computer
8. Turn off USB storage
9. Power off phone
10. Hold down the Volume Down button (VOL DOWN) and keep it held down
11. Press and release (POWER)
12. When you see the white screen you can release (VOL DOWN)

It will quickly do something and then present 4 options


13. Press (VOL DOWN) to select the RECOVERY option
14. Press (POWER) to select RECOVERY

The phone will restart into a black ! screen


15. Press and hold (POWER)
16. Tap (VOL UP)
17. When you get a black screen you can release (POWER)


18. Use trackball to highlight 'apply sdcard:update.zip'
19. Click the trackball to select this

The installation will start - progress is shown by an orange progress bar

The phone will eventually reboot or you need to select REBOOT

20. Disconnect usb cable

21. Goto About phone

You should see the following:
Android Version: 2.2.2 Baseband Version: 32.36.00.28U_4.06.00.12_7 Kernel Version: 2.6.32.9-27240-gbca5320 android-build@apa26 #1 Build Number: FRG83G

Stage 5: Gingerbread

1. Reconnect USB cable
2. Turn on USB storage
3. From your computer, delete update.zip from the SD card
5. Copy 81304b2de707.signed-passion-GRI40-from-FRG83G.81304b2d.zip
6. Rename to update.zip
7. Eject the USB device phone from your computer
8. Turn off USB storage
9. Power off phone
10. Hold down the Volume Down button (VOL DOWN) and keep it held down
11. Press and release (POWER)
12. When you see the white screen you can release (VOL DOWN)

It will quickly do something and then present 4 options


13. Press (VOL DOWN) to select the RECOVERY option
14. Press (POWER) to select RECOVERY

The phone will restart into a black ! screen


15. Press and hold (POWER)
16. Tap (VOL UP)
17. When you get a black screen you can release (POWER)


18. Use trackball to highlight 'apply sdcard:update.zip'
19. Click the trackball to select this

The installation will start - progress is shown by an orange progress bar

The phone will eventually reboot or you need to select REBOOT

20. Disconnect usb cable

21. Goto About phone

You should see the following:
Android Version: 2.3.3 Baseband Version: 32.41.00.32U_5.08.00.04 Kernel Version: 2.6.35.7-59423-g08607d74 android-build@apa28 #1 Build Number: GRI40

Stage 6: Delete phone data (but not your SD card)

NB: I'm not sure this is required.

1. Goto Settings - Privacy - Factory data reset

If you want to keep your SD card data, DO NOT select 'Erase SD card'


Stage 7: Login and restore your apps

Once you enter your Google account details, your Google apps and settings should be restored. Your other apps will also be restored but y.our data will not be restored - use your backup

Any app not installed from the market will need to be manually restored.

I may have interrupted the restoration process by switching to a different WiFi Access Point - you probably should not do that.

Sunday, 20 February 2011

Our Rain Water Tank Needs Treatment Again

The last treatment to increase the pH was 29/1/2011 - about 50 days ago.

Our tanks are still full due to the substantial rain we have had.

The pH before treatment was 6.6 which, being below 7, is right for the Blue-Green stain to re-appear indicating that our copper pipes are dissolving again.

I treated it with 1L of lime and the pH rose to 10.6. This will drop as the lime spreads throughout the tank; as we consume the water; and as we collect more water.

In case it is useful, the water meter is on about 104kL.

Saturday, 19 February 2011

Boot a Real Mac OS-X Partition under Linux and VirtualBox - What Works

VirtualBox 4.0


Works (does something)
  • Nat networking
  • Safari (I have edited this post using Safari on the OS-X VM)
  • iTunes (starts - that is all I have done)
  • iPhoto (starts - that is all I have done)
  • About
  • System Preferences
  • Finder
  • Finder sees other SMB and AFS shares
  • Shutdown (mostly) 
  • 1 CPU runs flat-out - to 'fix' this I ran this command. When the VM is idle the host load is much reduced:
  • sudo rm -fr /System/Library/Extensions/AppleIntelCPUPowerManagement.kext
  • By removing /System/Library/Extension
  • Calculator
  • YouTube
  • Sound - I have tried IntelHD/ALSA
  • USB with VirtualBox extras
  • Disk Utility
  • Intel PRO/1000 MT Desktop (Bridged adapter, eth1)
  • Time Machine backup to Time Capsule if a network bridge is available

Does not work (or I can't get it working)
  • glxgears (X11 crashes repeatedly)
  • Shutdown (rarely)
  • V8 Benchmark runs too slow for Safari's liking

VirtualBox 3.2.8 OSE


Works (does something)
  • Nat networking
  • Safari
  • iTunes (starts - that is all I have done)
  • iPhoto (starts - that is all I have done)
  • About
  • System Preferences
  • Finder
  • Finder sees other SMB and AFS shares
  • Shutdown (sometimes) 
  • 1 CPU runs flat-out
  • Calculator
  • YouTube
  • Disk Utility

Does not work (or I can't get it working)
  • Bridge Networking
  • Audio
  • glxgears (X11 crashes repeatedly)
  • Finder can not connect to other SMB and AFS shares
  • Shutdown (sometimes)
  • V8 Benchmark runs too slow for Safari's liking


Boot a Real Mac OS-X Partition under Linux and VirtualBox

This should be easy, but Apple make it hard.

I have a MacBook Pro. I have OS-X Leopard 10.5.2 installed as well as Ubuntu 10.10 linux.

I wanted to get my OS-X partition to run as a virtual machine.

After many false starts I got something to work.


First, the specs.
Hardware: MacBook Pro 4,1, early 2008, 2.4GHz, 200GB, 15"
http://en.wikipedia.org/wiki/MacBook_Pro
Host OS: Ubuntu 10.10
VM Manager: VirtualBox 3.2.8 OSE r64453
Guest OS: OS-X 10.5.2 Leopard (I don't bother to update it as I don't use it much and it have virtually nothing installed)
Overview

1. Get VirtualBox to list the physical partition in the Virtual Media Manager.
2. Setup the VM
3. Tweak it.
3. Run it.

1. Setup Disk Image

Please proceed at your own risk. Only do this if you have backed-up your disk partitions (with Time Machine for example, but don't forget about your linux partition) or your don't care about any data on your disk.

I used this information to create my VMM vmdk file.
http://ejs.seniejitrakai.net/2010/11/01/running-virtualbox-guests-from-physical-drive/
In my case, my hard drive is /dev/sda under linux.


phil@max:~$ VBoxManage internalcommands listpartitions -rawdisk /dev/sda

Oracle VM VirtualBox Command Line Management Interface Version 3.2.8_OSE(C) 2005-2010 Oracle CorporationAll rights reserved.
Number  Type   StartCHS       EndCHS      Size (MiB)  Start (Sect)1       0xee  1023/254/63  1023/254/63           200            12       0xaf  1023/254/63  1023/254/63        119102       4096404       0x83  1023/254/63  1023/254/63         11444    2443309763       0xaf  1023/254/63  1023/254/63         23167    343011768


The OS-X partition in my case is number 3. It is about 23GB.

Then I made the vmdk file like this:

phil@max:~$ VBoxManage internalcommands createrawvmdk -filename /home/phil/.VirtualBox/HardDisks/example.vmdk -rawdisk /dev/sda -partitions 3 -register 
Oracle VM VirtualBox Command Line Management Interface Version 3.2.8_OSE(C) 2005-2010 Oracle CorporationAll rights reserved.
RAW host disk access VMDK file /home/phil/.VirtualBox/HardDisks/example.vmdk created successfully.

This made this file - yours will be different, but it should have the same structure:

# Disk DescriptorFileversion=1CID=279c9811parentCID=ffffffffcreateType="partitionedDevice"
# Extent descriptionRW 1 FLAT "example-pt.vmdk" 0RW 409639 ZERO RW 243921336 ZERO RW 23437500 ZERO RW 75243292 ZERO RW 47448016 FLAT "/dev/sda" 343011768RW 262184 ZERO 
# The disk Data Base #DDB
ddb.virtualHWVersion = "4"ddb.adapterType="ide"ddb.geometry.cylinders="16383"ddb.geometry.heads="16"ddb.geometry.sectors="63"ddb.uuid.image="99ca08b3-6d2e-4ed4-8790-2430cfe5a57a"ddb.uuid.parent="00000000-0000-0000-0000-000000000000"ddb.uuid.modification="00000000-0000-0000-0000-000000000000"ddb.uuid.parentmodification="00000000-0000-0000-0000-000000000000"

Now if you run Virtual Media Manager, you should now see a new hard drive entry for your physical partition.


That wasn't that hard, thanks to Sun/Innotek for making this easy.

2. Setup VM.

The key fields are these:
OS Type = Mac OS X
Use an existing hard disk - the one I created above: example.vmdk
The rest are the current defaults (which I will list below).
I also enabled 3D acceleration, but I can pick either.
Too easy, right?

3. Tweak VM

Apple OS-X checks to see if a special key is in a chip. VMs don't currently emulate this chip with the key, so you need to get the key off your machine and add it manually to the VirtualBox XML file that describes the VM.

The key is really a plea from Apple to not steal their OS. Here is their EULA for 10.5.

http://images.apple.com/legal/sla/docs/macosx105.pdf

It contains this clause:

A. Single Use. This License allows you to install, use and run one (1) copy of the Apple Software on a single Apple-labeled computer at a time. You agree not to install, use
or run the Apple Software on any non-Apple-labeled computer, or to enable others to do so. This License does not allow the Apple Software to exist on more than one
computer at a time, and you may not make the Apple Software available over a network where it could be used by multiple computers at the same time. 

I think this complies: One licensed and installed copy of OS-X on an Apple-labeled computer. I can't run it twice because that would do bad things to the file system.

So, I'll continue...

In my case the XML file is /home/phil/.VirtualBox/Machines/example/example.xml

This is what it might look like:


<?xml version="1.0"?>
<VirtualBox xmlns="http://www.innotek.de/VirtualBox-settings" version="1.11-linux">
  <Machine uuid="{0db68b53-a452-40bd-bb83-ad8952411320}" name="example" OSType="MacOS" snapshotFolder="Snapshots" lastStateChange="2011-02-19T08:34:33Z">
    <MediaRegistry>
      <HardDisks/>
      <DVDImages/>
      <FloppyImages/>
    </MediaRegistry>
    <Hardware version="2">
      <CPU count="1" hotplug="false">
        <HardwareVirtEx enabled="true" exclusive="true"/>
        <HardwareVirtExNestedPaging enabled="true"/>
        <HardwareVirtExVPID enabled="true"/>
        <PAE enabled="true"/>
        <HardwareVirtExLargePages enabled="false"/>
        <HardwareVirtForce enabled="false"/>
      </CPU>
      <Memory RAMSize="1024" PageFusion="false"/>
      <Firmware type="EFI"/>
      <HID Pointing="USBTablet" Keyboard="USBKeyboard"/>
      <HPET enabled="true"/>
      <Chipset type="ICH9"/>
--- SNIP --- 


  </Machine>
</VirtualBox>

As you can see, the whole configuration of a VM is, more-or-less, understandable.

But wait! To do the next bit, you have to run the VM once. Until you do this scary thing, the XML file is missing bits that make the next part easier.

So, start the VM. When you see lots of text you can close the window and shutdown the VM.


This is all safe it seems.

My example VM XML file now looked like this - the highlighted bits are what we want to see:


<?xml version="1.0"?>
<VirtualBox xmlns="http://www.innotek.de/VirtualBox-settings" version="1.11-linux">
  <Machine uuid="{57d6a1c9-833f-4fb7-b765-f4c37793bc56}" name="example" OSType="MacOS" snapshotFolder="Snapshots" lastStateChange="2011-02-19T08:27:47Z">
    <MediaRegistry>
      <HardDisks/>
      <DVDImages/>
      <FloppyImages/>
    </MediaRegistry>
    <ExtraData>
      <ExtraDataItem name="GUI/LastCloseAction" value="powerOff"/>
      <ExtraDataItem name="GUI/LastGuestSizeHint" value="1024,768"/>
      <ExtraDataItem name="GUI/LastNormalWindowPosition" value="400,61,1024,815"/>
      <ExtraDataItem name="GUI/LastWindowPostion" value="37,53,1024,815"/>
      <ExtraDataItem name="GUI/MiniToolBarAlignment" value="bottom"/>
      <ExtraDataItem name="GUI/SaveMountedAtRuntime" value="yes"/>
      <ExtraDataItem name="GUI/ShowMiniToolBar" value="yes"/>
    </ExtraData>
--- SNIP --- 
  </Machine>
</VirtualBox>

To tweak it, I followed these instructions:
http://www.takwing.idv.hk/tech/virtual/vb320_macvm/page3.html

Modify your VM's xml file by adding the following line to the section:

<ExtraDataItem name="VBoxInternal2/SmcDeviceKey" 
value="ourhardworkbythesewordsguardedpleasedontsteal(c)AppleComputerInc"/>


Mine then looked like this:

<?xml version="1.0"?>
<VirtualBox xmlns="http://www.innotek.de/VirtualBox-settings" version="1.11-linux">
  <Machine uuid="{57d6a1c9-833f-4fb7-b765-f4c37793bc56}" name="example" OSType="MacOS" snapshotFolder="Snapshots" lastStateChange="2011-02-19T08:27:47Z">
    <MediaRegistry>
      <HardDisks/>
      <DVDImages/>
      <FloppyImages/>
    </MediaRegistry>
    <ExtraData>
      <ExtraDataItem name="GUI/LastCloseAction" value="powerOff"/>
      <ExtraDataItem name="GUI/LastGuestSizeHint" value="1024,768"/>
      <ExtraDataItem name="GUI/LastNormalWindowPosition" value="400,61,1024,815"/>
      <ExtraDataItem name="GUI/LastWindowPostion" value="37,53,1024,815"/>
      <ExtraDataItem name="GUI/MiniToolBarAlignment" value="bottom"/>
      <ExtraDataItem name="GUI/SaveMountedAtRuntime" value="yes"/>
      <ExtraDataItem name="GUI/ShowMiniToolBar" value="yes"/>
      <ExtraDataItem name="VBoxInternal2/SmcDeviceKey" value="ourhardworkbythesewordsguardedpleasedontsteal(c)AppleComputerInc"/>
    </ExtraData>
--- SNIP --- 
  </Machine>
</VirtualBox>    

4. Run it.

That's it.

Let me know if it worked for you, and if you have a different hardware, host, guest configuration.

If it didn't work, then I probably can't help - but you you want me to explain anything that I did in more detail then please ask.

BTW, if this kills you disk, damages your data, or generally make your life a misery then you will recall that I warned you, right?