In case this is copied, go to the original site which should be http://philatwarrimoo.blogspot.com/2011/02/howto-vodafone-uk-nexus-one-to.html
A friend made this great guide.
http://ossadmin.wordpress.com/2011/02/26/goodbye-vodafone-uk-nexus-one-rom/
I have to same phone with the same Vodafone UK ROM and I kept my log of what I did in case it might help others.
All of the screenshots are from the above blog.
Notes:
All the following stages are similar. The first is a little different, but the others are virtually the same - the differences being the URL to get the file, and the name of the file to copy to your phone's SD card.
Sometimes the phone will automatically reboot after the installation of the update.zip file - other times you will need to manually reboot it by selecting the right menu item. All of this should be obvious.
Just follow these steps in order. If you get lost or miss a step, just start again (I did that a few times).
MD5
I do not know the original MD5 sums of the files listed below, but so you can verify that you get the same file as I did, here are my MD5 sums:
2854b06b22b9.signed-passion-FRG83G-from-FRG83D.2854b06b.zip
23a17e5f70d794858e0fe7aba308c3d7
766a101ae02c.signed-passion-ota-60505.766a101a.zip
1b3a95a92b0fd319f0e730b80e1e03ac
1b3a95a92b0fd319f0e730b80e1e03ac
81304b2de707.signed-passion-GRI40-from-FRG83G.81304b2d.zip
706a4631271b6ee2c819ab548394b71e
ecb21b752065.signed-passion-FRG83D-from-FRG83.ecb21b75.zip
0fb26549e9de782e86e665a68693c50a
Passion_Google_WWE_2.16.1700.1_FRG33_MFG_Shipment_ROM.zip
3bcdbb83a4b951f813ca88771d69894d
passimg.zip (the file extracted from the file above)
d90635c2d269c6a26f77ae1a681e5424
Stage 1: Revert to Android 2.2


Stage 1: Revert to Android 2.2
1. Get http://shipped-roms.com/
2. Extract PASSIMG_Passion_
3. Rename to passimg.zip
4. Connect a USB cable to your computer and turn on USB storage
5. From your computer, copy passimp.zip to the root directory of your SD card
6. Eject USB device phone from your computer
7. Turn off USB storage
8. Power off the phone using the Power button (POWER) - like you normally would do
9. Hold down the Volume Down button (VOL DOWN) and keep it held down
10. Press and release (POWER)
11. When you see the white screen you can release (VOL DOWN)
A blue progress bar will be shown as it loads passimg.zip
12. After a while it will ask: 'Do you want to start update?' Press the Volume Up button (VOL UP) to say yes
The update will take a while. Progress is shown with various coloured progress bars
13. When done it will ask: 'Do you want to reboot device?' Press (VOL UP) to say yes
The phone will reboot
14. Disconnect the USB cable
The phone will say 'Welcome to Nexus One'. You don't want to do anything here so for me I skipped the setup like this:
15. Touch the screen
16. Tap the Skip button
17. Tap the Skip button
18. Tap Next button
Now, you can check to see if it all worked:
19. Find and launch the Settings app
20. Goto About phone
You should see the following:
Android Version: 2.2 Baseband Version: 32.41.00.32U_5.08.00.04 Kernel Version: 2.6.32.9-27237-gbe746fb android-build@apa26 #1 Build Number: FRG33
Stage 2: Upgrade to 2.2.1
1. Reconnect USB cable
2. Turn on USB storage
3. From your computer, delete passimg.zip from the SD card
5. Copy 766a101ae02c.signed-
6. Rename it to update.zip
7. Eject the USB device phone from your computer
8. Turn off USB storage
9. Power off the phone
10. Hold down the Volume Down button (VOL DOWN) and keep it held down
11. Press and release (POWER)
12. When you see the white screen you can release (VOL DOWN)
It will quickly do something and then present 4 options
13. Press (VOL DOWN) to select the RECOVERY option
14. Press (POWER) to select RECOVERY
The phone will restart into a black ! screen
15. Press and hold (POWER)
16. Tap (VOL UP)
17. When you get a black screen you can release (POWER)
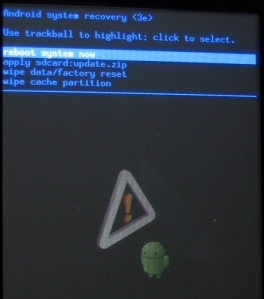
18. Use trackball to highlight 'apply sdcard:update.zip'
19. Click the trackball to select this
The installation will start. Progress is shown by an orange progress bar
The phone will eventually reboot
20. Disconnect usb cable
21. Goto About phone
You should see the following:
Android Version: 2.2.1Baseband Version: 32.36.00.28U_4.06.00.12_7 Kernel Version: 2.6.32.9-27240-gbca5320 android-build@apa26 #1 Build Number: FRG83
Stage 3: FRG83 to FRG83D
1. Reconnect USB cable
2. Turn on USB storage
3. From your computer, delete update.zip from the SD card
5. Copy ecb21b752065.signed-passion-
6. Rename to update.zip
7. Eject the USB device phone from your computer
8. Turn off USB storage
9. Power off phone
10. Hold down the Volume Down button (VOL DOWN) and keep it held down
11. Press and release (POWER)
12. When you see the white screen you can release (VOL DOWN)
It will quickly do something and then present 4 options
13. Press (VOL DOWN) to select the RECOVERY option
14. Press (POWER) to select RECOVERY
The phone will restart into a black ! screen
15. Press and hold (POWER)
16. Tap (VOL UP)
17. When you get a black screen you can release (POWER)
18. Use trackball to highlight 'apply sdcard:update.zip'
19. Click the trackball to select this
The installation will start - progress is shown by an orange progress bar
The phone will eventually reboot or you need to select REBOOT
20. Disconnect usb cable
21. Goto About phone
You should see the following:
Android Version: 2.2.1Baseband Version: 32.36.00.28U_4.06.00.12_7 Kernel Version: 2.6.32.9-27240-gbca5320 android-build@apa26 #1 Build Number: FRG83D
Stage 4: Upgrade to 2.2.2 and FRG83G
1. Reconnect USB cable
2. Turn on USB storage
3. From your computer, delete update.zip from the SD card
5. Copy 2854b06b22b9.signed-
6. Rename to update.zip
7. Eject the USB device phone from your computer
8. Turn off USB storage
9. Power off phone
10. Hold down the Volume Down button (VOL DOWN) and keep it held down
11. Press and release (POWER)
12. When you see the white screen you can release (VOL DOWN)
It will quickly do something and then present 4 options
13. Press (VOL DOWN) to select the RECOVERY option
14. Press (POWER) to select RECOVERY
The phone will restart into a black ! screen
15. Press and hold (POWER)
16. Tap (VOL UP)
17. When you get a black screen you can release (POWER)
18. Use trackball to highlight 'apply sdcard:update.zip'
19. Click the trackball to select this
The installation will start - progress is shown by an orange progress bar
The phone will eventually reboot or you need to select REBOOT
20. Disconnect usb cable
21. Goto About phone
You should see the following:
Android Version: 2.2.2 Baseband Version: 32.36.00.28U_4.06.00.12_7 Kernel Version: 2.6.32.9-27240-gbca5320 android-build@apa26 #1 Build Number: FRG83G
Stage 5: Gingerbread
1. Reconnect USB cable
2. Turn on USB storage
3. From your computer, delete update.zip from the SD card
5. Copy 81304b2de707.signed-
6. Rename to update.zip
7. Eject the USB device phone from your computer
8. Turn off USB storage
9. Power off phone
10. Hold down the Volume Down button (VOL DOWN) and keep it held down
11. Press and release (POWER)
12. When you see the white screen you can release (VOL DOWN)
It will quickly do something and then present 4 options
13. Press (VOL DOWN) to select the RECOVERY option
14. Press (POWER) to select RECOVERY
The phone will restart into a black ! screen
15. Press and hold (POWER)
16. Tap (VOL UP)
17. When you get a black screen you can release (POWER)
18. Use trackball to highlight 'apply sdcard:update.zip'
19. Click the trackball to select this
The installation will start - progress is shown by an orange progress bar
The phone will eventually reboot or you need to select REBOOT
20. Disconnect usb cable
21. Goto About phone
You should see the following:
Android Version: 2.3.3 Baseband Version: 32.41.00.32U_5.08.00.04 Kernel Version: 2.6.35.7-59423-g08607d74 android-build@apa28 #1 Build Number: GRI40
Stage 6: Delete phone data (but not your SD card)
NB: I'm not sure this is required.
1. Goto Settings - Privacy - Factory data reset
If you want to keep your SD card data, DO NOT select 'Erase SD card'
Stage 7: Login and restore your apps
Once you enter your Google account details, your Google apps and settings should be restored. Your other apps will also be restored but y.our data will not be restored - use your backup
Any app not installed from the market will need to be manually restored.
I may have interrupted the restoration process by switching to a different WiFi Access Point - you probably should not do that.


