Sunday, 16 December 2012

Building and using a Linux UML environment

Intro

I want to test a script that randomly creates files all over a file system.

Naturally, I don't want to test this on my Linux system.

I tried fakechroot fakeroot chroot and schroot but I could not get them to do what I wanted.
fakechroot fakeroot chroot in particular allowed access to all files using '/..' - not what I wanted at all.

Method

I'm using pbuilder because it seems easy (once you know how).

  • It can also be run as a user.
  • It does not take up much space since UML environment is in a tar gzip file.
  • Changes within UML can be saved or lost (default).

To construct your sandpit

I called it 'sandpit', but you can call it what you like. Just replace sandpit with your preferred name.
Also, there is nothing stopping you making multiple sandpits.

pcreate -a amd64 -d lucid sandpit

I was running 64 bit Linux so I choose amd64
I did not care what distro I used so I choose lucid

To put/copy files into your sandpit

Files in ~/Projects/sandpit are available within your sandpit

cp ~/Projects/sandpit/

To get into your sandpit

ptest -p sandpit

After you exit, any changes will be gone.

To save changes in your sandpit

ptest -p sandpit --save


Sunday, 18 November 2012

Cleaning and Idle Speed Control Valve

In a previous post, I described how my NL Fairlane had an Idle problem and how I eventually got it fixed.

I later concluded that my old ISC must simply be clogged and devised a method to clean it.

Background

Idle Speed Control (ISC) valves are also known as Idle Air Controllers (IAC) and Bypass valves (BYP).

There are numerous patents for these devices. Mine is made by Hitachi, but this patent from BLD seems closest:


These Hitachi patents are also similar: US5188073US6571766, and US6065447

You can see that there are numerous patents for variations on this theme and I did not find them all.


Some describe how certain features work, but it seems that my ISC is powered by vacuum and limited by its solenoid. 

These designs have long-thin hollow shafts and tiny vent holes. It is very important to have these clean. 


One patent discusses how it should keep working even if these holes get blocked - sort of limp-home-mode.

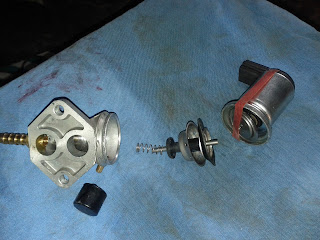
Inside an ISC

I pulled apart an ISC that was supposed to be a replacement part for my car. It did not work and I decided to dismantle it.


A close-up of actual valve, shaft, and diaphragm.


These solenoids are complex. What is interesting is that they do not directly move a valve. They simply limit how far its valve can open.


Cleaning


Cleaning should not be a problem except that this is an electrical component and contains rubber seals and diaphragms that can not be directly seen or accessed.

I decided that I'd limit cleaning fluids to WD40 (or similar), Isopropyl alcohol, and compressed air.

Cleaning the parts that can be seen is straight forward: spray with WD40, scrub components gently with a small brush, blow out excess. Later you can rinse and with Isopropyl alcohol.

At one end you will see a spring over a tube that guides a valve shaft. This tube is fixed in place by a cast socket that has a small 3 mm diameter hole. This hole allows vacuum to pass through a shaft and into a space between solenoid and diaphragm. This space is also vented by brass fitting that is usually covered by a black filter.

Pull off this filter. At first this will be hard to do. Be gentle and work on it slowly to remove it undamaged.

I sprayed in WD40 through this vent and also through that hole mentioned above.

I then ran my air compressor up to about 10 PSI and connected it to that vent as shown below.


I cut a piece of plastic tube to force close my ISC's valve.

(My old ISC has a LPG modification that I have sealed with a blocked pipe. I also snapped off a flange by using an incorrect gasket.)


With this tube in place, I can pressurised diaphragm space using vent fitting, and by covering a large vent hole with my thumb.


By gently forcing air and WD40 through my ISC I was able to flush and clean out shaft and vents.


Monday, 12 November 2012

My Faulty Ford MAP Sensor


Inside a MAP (Manifold Absolute Pressure) sensor from an old Ford.

In my case, a Ford Fairlane NL, March 1998.

This one 'works' but it's output frequency is about half what it should be: 89 Hz instead of 160 Hz. I can't explain why. It still works - frequency varies with pressure.

Manifold pressure is measured by a round transducer (middle of picture). It is about 10 mm diameter and contains a square plate covered by a semi-liquid jelly. Covering and connecting this sensor to an external pipe fitting is a rubber boot (as pictured).

To test, I applied 5 V DC and used an oscilloscope to measure peak-to-peak output voltage and frequency.


I measured 0.2 V DC to about 5 V DC, 88.8 Hz, 50% duty cycle. 

Thursday, 25 October 2012

Put BenF firmware on DSO201

I have a DSO201, serial E1BE8DE3, Licence 1818C8BC, Device Firmware Upgrade V3.22A

I did the following to put on BenF's firmware packaged by Alf (5th post down):

I held '-' (down? key) while turning on. I got a firmware upgrade screen.

I connected my DSO to my Linux laptop USB port. I got a "DFU V3_22_A" mounted device in Nautilus file manager.

I extracted 2 hex files: V353_LIB.HEX and V364_APP.HEX from Alf's zip file.

I copied (dragged) V353_LIB.HEX to DFU V3_22_A device. After a second, my DFU device vanished and then reappeared. File name had changed to .RDY.

I copied (dragged) V364_APP.HEX to DFU V3_22_A device. After a second, my DFU device vanished and then reappeared. File name had changed to .RDY.

I ejected DFU device.

I disconnected USB cable.

I turned off DSO and back on a few seconds later.

Beautiful! BenF Firmware now running.

Thanks Alf.
Thanks BenF.
Thanks to whoever designed and made this open hardware, open software DSO!

I got mine from this seller on ebay: ljstore2009 

http://www.ebay.com.au/itm/160804672559?ssPageName=STRK:MEWNX:IT&_trksid=p3984.m1439.l2649#ht_5877wt_914

Sunday, 21 October 2012

On-line printing photos should not be this hard!

Are there are any other ways to store, manage, share and print our photos without being locked in to a single or subset of 'approved' suppliers?

OUR STORY

( for those that are bored with their life and want to be bored by ours )

My wife wanted to send a lot of photos to a company of her choice to be printed into a book. This time we chose BIG W Photos.

Should be easy.

PHOTO 'STORAGE'

Our digital photos are as well ordered as a junk shop: everything is in one place but no one knows exactly where.

To avoid having photos and duplicated photos spread across 20,000 devices in our family I have been trying to get all photos de-duplicated and uploaded to a cloud - I choose Picasa but it could have been any service.

UPLOADING

Getting photos there was not easy. Our cr48 ChromeBook would not work either by plugging in our camera or its SD card. So I switched to a laptop running Ubuntu. This worked but it was tedious.

SENDING TO BOOK PRINTER

Our chosen printing service is not on PicasaWeb's list so we now needed to download all photos to be printed and then upload them to our printer.

You can not do this from PicasaWeb unless you have a Picasa application installed. Google stopped supporting Picasa for Linux some time ago. I think this is good as we should be using web apps to become more device independent.

RE-DOWNLOADING

I discovered that I can download a zip file of all photos in an album from Google+.

Why can't I do this from PicasaWeb?

First we had to move or copy selected photos from one album to a new album because you can not download selected photos using Google+ - just an album.

UPLOADING

Now we have our selected photos in a directory on a laptop (again!), we could now upload them to our book printer.

None of this makes sense. This is daft!

TO FIX THIS WE NEED CLOUD PRINTING

If our printer was truly a cloud printer then we should be able to one-time-share or one-week-share our photos with them. They could then download what we selected and shared, print them and post a book to us.

This would be a bit closer to 'cloud' printing.

Saturday, 20 October 2012

Installing Ubuntu 12.10 on MacBookPro9,1 and all is good

Short Version

You need rEFInd, Ubuntu 12.10, 3.6 kernel, macfanctld.

All is good - except Nvidia drivers that did not work so well, especially by breaking resume which is something I must have.

Details


This is what I am doing:

Getting Ubuntu

Download ubuntu 12.10 - why not consider donating as well?
Burn to DVD.
Eject DVD.

Booting to Live Ubuntu

Shutdown MacBookPro9,1 (MBP).
Hold down 'option' key from here on.
Turn on MBP.
Push in DVD.
Hold down 'option' until you see pictures of hard drives and perhaps CDs and USBs.
Wait a while. Eventually you will see two DVDs: 'Windows' and 'EFI Boot'.
Click on 'EFI Boot'.
Select 'EFI Boot' with arrow keys and hit Enter.
Select 'Try Ununtu without installing' and hit Enter.
Ubuntu Live will start. This will take a few minutes.

Installing

Double-click 'Install Ubuntu 12.10'.
I then selected English and due to my own special requirements, I selected 'something else'.
You might like to try 'Install Ubuntu alongside...'

Note: if you select 'Erase disk and install Ubuntu' then you will get exactly that - my guess is that you DO NOT want to do that.

Here I have to setup my partition manually - you will not have to do this.
If you are interested in my setup, I have this:
sda1: efi 209 MB (EFI partition)
sda2: hfs+ 70 GB (OS-X)
sda3: hfs+ 650 MB (OS-X recover?)
sda4: biosgrub 200 MB (don't remember)
sda8: swap 20 GB
sda5: ext4 20 GB (linux root)
sda6: ext4 20 GB (linux root No. 2)
sda7: ext4 350 GB (/home)

(Boot loader on sda)

Selected Sydney, English(US) keyboard layout, created my user account, selected an icon, and Ubuntu started to install.

It was very quick to install for me.

Shutting Down

Hit 'Restart Now' button.
DVD ejected.
Hit Enter.
Hold down 'option' as soon as you here your MBP starting up.

Booting into Ubuntu

Hold down 'option' until you see pictures of hard drives and perhaps CDs and USBs.
Select 'Windows' and hit Enter.
I got an unhelpful 'Grub Recovery' prompt.
RATS!

Fixing Grub Recovery

I suspect that grub could not read or find my Ubuntu partition. Just a guess.
Odd. It is not as if there aren't very many MacBookPro9,1's around...
I have rEFInd installed so I tried that.
You can install rEFInd from OS-X. See here.
You may be able to use rEFIt if you have that installed, but I recommend rEFInd.

Booting using rEFInd

Shutdown.
Power on.
Select Ubuntu.
After some dodgy screen effects, Ubuntu booted to a blue background.

Getting 'Everything' Working

Ubuntu first wanted me to install language support.
To do this you will need a wired Ethernet connection to your Internet router.

Wireless

Install these packages
  • b43-fwcutter
  • linux-firmware (this should already be installed)
  • linux-firmware-nonfree
Reboot.

Note: I think a friend suggested bcmwl-kernel-source instead of these files, but it did not work for me - perhaps I misunderstood.

Kernel Upgrade

My previous experience suggests that a 3.6 kernel works better.
So I have installed four files from here - you can pick what kernel you want. Install the 'all' file, then the other header file followed by each image file.

UPDATE: I have found that only 3.7.0 and 3.7.5 (so far) work.

After a reboot, I noticed that my initial screen was no longer corrupted.

Fan

You have to have fan control or else your MBP will run too hot.
I used macfanctld from mactel support PPA (precise version).
I also have also written my own for a MBP4,1 that I'll test someday.

Summary

You need rEFInd, Ubuntu 12.10, 3.6 kernel, macfanctld.
Since Fan and sleep/wake are working now, I'm happy to turn this MBP into my daily compute.

I have also tried various Nvidia drivers - some work, but at a high cost of not resuming after standby. So I have removed these.


This works fine, but requires rEFInd. This is not a bad thing as rEFInd is really good, well documented and seems to be maintained by someone who knows a lot about EFI.

But, I want to try to boot to Linux without rEFInd. This may not be possible.

Another Attempt


Boot to OS-X.
Instructions taken from here - Read these. Below is just what I did, not something you should just blindly copy.
Download and install gdisk.
Open a terminal.
sudo gdisk /dev/disk0
I deleted my unwanted Linux partitions from previous attempts.
I created a new partition: id 99, 128M, type ef02 as per instructions.
Restart OS-X, hold down 'option' key and insert Ununtu DVD.
When available, select 'EFI Boot'.
Select 'Install Ubuntu'.
Select 'Something Else'.
Setup a 1 GB reiser boot, 19 GB ext4 root, 19 GB spare, 20 GB swap and rest is ext4 home.
After install, boot to OS-X.
sudo gdisk /dev/disk0
Follow instructions to remove hybrid MBR.
I made a Super Grub 2 Disk but it could not identify any grub 2 installation.

This got me no where, except I no longer have a 'dangerous' hybrid MBR.


Sunday, 7 October 2012

Ford Fairlane NL Idle Problem

I have a March 1998 Ford Fairlane NL. It has dual fuel (petrol and LPG).

It also seems to have a special version of Ford's 4.0L straight six engine.

http://autofix.com.au/blog/el-falcon-hybrid-engine-camshaft-timing

I recently had a significant head gasket leak which rendered my car unusable, but leading up to this I had slight coolant consumption and an increasingly annoying idle problem.

Coolant Leak

I had the head gasket done 3-4 years ago. About a year or more after this we noticed that coolant was slowly disappearing. It was just an annoyance so we put up with it. By loosing my radiator cap 1 notch we hardly ever had to add water or coolant.

Idle Problem

Leading up to my second head gasket failure, my Fairlane started to stall at seemingly random times - usually when my wife was driving and usually at a corner or intersection.

Over time, our Fairlane started to stall more and more until my wife would not drive it.

Blown Head Gasket

One day, after a trip to get some wood, my head gasket failed - very dramatic smoke screen.

I was not happy - head gaskets should last longer than this - but also supposed that my idle problem was probably linked to coolant being sucked into engine cylinders.

I decided to replace my head gasket myself this time, but that is a story for another blog.

After replacing my head gasket, it was obvious very quickly that my idle problem had not been fixed - in fact it seemed far worse.

Symptoms

Once my engine was at normal operating temperature it operates normally until I release my throttle. At this point my gear box is driving my engine so nothing happens, but once I begin to slow or brake and revs drop my idle problem begins.

Sometimes my engine revs drop below idle speed (about 750 RPM) and keeps on dropping until it stalls or I tap my throttle - so braking becomes a two foot process.

Recent Work

Due to other faults, I have recently replace these parts:

Fuel filter (Old one was full of rust)
Fuel rail, regulator and fuel injectors.
No.1 Cylinder spark plug - cracked
Distributor (suspect failed PIP sensor)
Leads
Ignition coil (cracked)
ECU (computer)
MAP sensor
ISC valve (but I put back original one because I need to modify my new one for LPG)

A few more parts and I will have a new car!

Diagnosis

I was fairly confident that none of these recently replaced parts were at fault. I was concerned that it could be my ISC valve, but a replacement one seemed worse.

I accessed my engine's ECU fault codes. It reported 'all ok' (code 111) but also 'engine running lean' (code 172).'

http://www.troublecodes.net/Ford/eec-iv.shtml

After some driving I noticed that when on LPG and when my engine would begin to stall, my LPG 'lean' light would be on. This seemed to confirm code 172. But when my LPG 'rich' light was on my engine would behave normally and it would not stall while moving or stopped.

I decided to try to test my oxygen sensor. This seems hard but I also came across people suggesting that water/coolant damages oxygen sensors - one person recommended replacing oxygen sensors when a head gasket is replaced - presumably because it is likely that coolant would be pumped into exhaust ports and would naturally come in contact with an oxygen sensor. Another suggested that moisture damages oxygen sensor heaters.

http://www.repcotrade.com.au/go/news/servicing-oxygen-sensors

http://www.fordaustraliaforums.com/forum/showthread.php?40030-Ef-el-faults-amp-fixes-simplified

http://www.hptuners.com/forum/showthread.php?t=27179

Theory

So my theory is that my long term coolant leaks have slowly been damaging my oxygen sensor, causing my engine to increasingly stall on occasions.

Solution

I have ordered a new oxygen sensor.

Oxygen sensor has arrived and is installed.

Results

There was some 'change' but nothing dramatic.

I installed my new ISC valve (That isn't what I bought - I paid about $95 AUD) and engine rarely stalls but it hunts - overshoots and undershoots and eventually stabilizes at 700 RPM.

But when idling to a stop, revs slowly drop to about 500 RPM. If revs drop below this something happens and revs pickup and my engine will sit at about 700 RPM.

What is now different is that on LPG my gas controller is indicating rich mixture when idling slow whereas before it was reporting lean.

Thoughts

* new ISC valve might be 'sticking' instead of moving smoothly - later testing casts doubt on this.
* ECU may not be driving ISC correctly - later proven ok.
* I wonder if I need to reset idle stop point? - later I did a small adjustment.
* some vacuum leak I have not found - found a few but nothing significant.
* ISC needs to be modified to LPG - I have not done this yet - now done.

More Results

For LPG, a gas pipe fitting was drilled into my ISC valve. This takes fumes from crank case via a one-way valve and burns them.

What seems odd to me is that it sucks very hard and I can not see how this is a controlled flow of fumes. It is only regulated by hose size (about 6 mm and a weighted 1-way valve that seems by design to leak).

Constricting this fume flow (squeezing hose with pliers) does seem to improve idle behaviour. I also recall inserting two 5 cm bamboo skewers into the hose to restrict flow so I decided to investigate this further.

PCV Valve

As I mentioned, this valve is closed by gravity and a light spring that does not seem to work unless it is open at least 3 mm.

Engine suction at idle is very high and it easily opens my PCV valve causing a lot of air to enter, bypassing ISC valve. Being an old engine, it 'breathes' a bit and this variation in air flow might be enough to cause idle instability.

I looked at my ISC signal using an oscilloscope and I could see it changing width of pulses to increase or decrease air flow - so ECU and ISC seem to be working.

My oscilloscope is a DSO201 worth about $70 AUD - it shows signals and calculates duty cycle, frequency, hi and low-pulse width - very handy.

I decided to re-design this by taking crank case fumes and injecting them in front of my throttle valve (this is when I found a small leak in a rubber bung).

My old ISC didn't like this change, but my new ISC was much happier - but I still had to adjust idle screw by 1/4 turn.

So perhaps my old ISC is not quite right.

Anyway, I have purchased a new PCV valve for $17 as well.

Vacuum Leaks

I found  a large tear in a flexible intake pipe. This could cause sudden loss of vacuum and cause instability - but this is not my problem.

I found a rubber bung had a small tear - this might affect LPG operation a tiny bit, but it shouldn't affect idle on petrol - so this is not my problem.

Result

Fixed!

Sort of.

There is a slight rev increase when coming to a stop. I had adjusted throttle stop 1/2 turn so I have moved it back 1/4 turn to see how that goes.

Engine does not hunt; it does not drop below about 600 RPM; it starts and idles ok (perhaps a little fast).

Postscript

After more trips, it was clear that all was not well. Idle speed still hunts and occasionally drops very low. My adjustment to throttle stop had also resulted in harsh gear 1 to 2 change.

I purchased another ISC (a second-hand one) and idle behaviour seems normal.

Tuesday, 25 September 2012

Ubuntu 12.10 Quantal on MacBook Pro 8,1

Quick Notes

  1. Used this live DVD
  2. Hold 'option' key when restarting or turning on
  3. Select 'windows' CD/DVD (wait a while for Mac EFI to 'see' CD/DVD)
  4. I tried both 'install beside OS-X' and custom (to make a separate home partition)
  5. No wireless after install. Not sure what exactly worked but I updated and installed these packages and rebooted:
  • b43-fwcutter
  • linux-firmware
  • linux-firmware-nonfree
  • firmware-b43-lpphy-installer

EFI Stuff

Later I did this:
  • Uninstalled grub-pc, grub-pc-bin etc. and installed grub-efi
No need for rEFIt or rEFInd unless you want them.

I'd use rEFInd now and ignore rEFIt.

What works

  • Right speaker
  • Wireless
  • Ethernet
  • Keyboard backlight, F5/F6 keys, and OSD
  • Display brightness, F1/F2 keys, and OSD
  • Volume control, F10/F11/F12 keys, and OSD
  • Lid close and sleep
  • Lid open and wake
  • Display (using i915 I think)
  • Touchpad

What does not work

  • Left speaker is soft
  • Bluetooth


Sunday, 24 June 2012

Working Mint 13 (based on Unubtu 12.04) on 15" MacBook Pro 9,1 (non-retina TM)

So far, I have succeeded - except I need to hold 'option' to get Mint to boot.

I was trying to get Ubuntu 12.04 installed, but Mint 13 had a better live DVD 'compatibility mode' that allowed linux to boot and run with a GUI.

Just to be clear: I have a 15" MacBoook Pro 9,1. This is a non-retina (TM) MacBook Pro.

According to wikipedia,

  • 15" version is 9,1 and has an Nvidia display
  • 13" version is 9,2 but does not have an Nvidia display
  • 15" retina (TM) version is 10,1 and seems similar in specification to 9,1


This is what I have tried:

ISO-2-USB EFI

1. Downloaded Ubuntu 12.04 desktop AMD64 mac iso

2. Downloaded a magical ISO-2-USB EFI-Booter for Mac 0.01 beta from

Followed instructions on this page:

This is my version:


  1. Format a USB drive with a MBR and FAT32 partition. Elsewhere some suggest a GUID instead of MBR. I used MBR. On linux Disk Utility, FAT32 is FAT.
  2. Make a /efi/boot directory tree on USB drive.
  3. Copy bootX64.efi from “ISO-2-USB EFI-Booter for Mac 0.01 beta” to /efi/boot
  4. Copy Ubuntu iso to /efi/boot/
  5. Rename iso to boot.iso. Check that you have 2 files in /efi/boot
  6. Reboot your Mac, hold down 'alt' key. Eventually you will see your Macs Normal OS, a Recovery, and EFI Boot.
  7. Select EFI Boot and the boot.iso will load.

For me, this works but it gets no further than a loading linux and a ramdisk.

rEFInd

I installed rEFInd (which works fine).
This will help me test various boot methods.
I installed rEFInd in my Mac's esp partition, and copied iso and ext2 drivers so rEFInd can look for EFI programs on CD/DVDs and EXT2 partitions.

rEFInd did not install first time.  I would try this file first, follow the OS-X instructions but instead of ./install.sh I recommend sudo ./install.sh

Boot Ubuntu CD

First Attempt
  1. I burnt a Ubuntu iso (see above) to CD
  2. Rebooted my Mac and inserted CD
  3. rEFInd started and listed bootable OSs. If CD image is not shown, hit ESC key to let rEFInd look again.
  4. Selected live
No good: just got a blank screen with a flashing cursor

Second Attempt
  1. Rebooted my Mac and inserted CD
  2. When I got to the 3 GRUB options, I selected live but modified the command to add these linux kernel boot options (before --): nomodeset nointremap vga=0x361. These hints came from this discussion
  3. Press Fn+F10 to run modified command
I get the Ubuntu splash screen, but it fails to boot with a vesafb error. 
It drops to a shell so linux is running but it seems it can not initialise graphics correctly.


Third Attempt
  1. Rebooted my Mac and inserted CD
  2. When I got to the 3 GRUB options, I selected install this time but modified the command to add these linux kernel boot options: nomodeset nointremap vga=0x361.
  3. Press Fn+F10 to run modified command
I get the Ubuntu splash screen, and the install process ran and completed.
I had to force power off.
On reboot, rEFInd did not run, but Grub did, however Ubuntu would not start - just a blank screen.
I re-blessed rEFInd and it now starts.

Getting closer...

Info

I think these are true - but that does not mean they are true:
  1. If you do not use nomodeset, you will not see anything on screen and linux will not boot. To fix, boot into OS-X (to reset video mode?) and then try linux again.
  2. Ubuntu and Mint installers/live DVDs seem to work by magic. Mint has these linux kernel options as found in /proc/cmdline

    file=/cdrom/preseed/mint.seed boot=casper xforcevesa nomodeset b43.blacklist=yes initrd=/casper/initrd.lz ramdisk_size=1048576 root=/dev/ram rw noapic noapci nosplash irqpoll -- BOOT_IMAGE=/casper/vmlinuz

    I think these ones in bold are key, so I will try them now...


Fourth Attempt
  1. Rebooted my Mac and inserted Mint DVD 13
  2. Mint in 'compatibility mode' works
  3. I installed Mint but it complained about not being able to install grub (I suspect) since Mint uses grub-pc for machines with a BIOS. I ignored this message and continued.
  4. After install, refind did not find Mint - not totally unexpected.
  5. Holding 'option' key down while turning my MacBook Pro on, I found that Apple's boot manager did detect a new OS. It labelled it 'Windows'.
  6. I let it boot 'Windows' and (from memory) I got a console screen - no GUI.
  7. I updated grub to include xforcevesa noapic noapci irqpoll options, ran update-grub and restarted.
  8. Success! Now Mint starts fine. Screen brightness is at max.
Now... what works and what does not work...

What works for me

  • Brightness keys (Brightness resumes at max setting after boot)
  • Volume keys
  • Track-pad
  • WiFi
  • Front Right speaker
  • Camera (using VLC)
  • Detects power
  • Mute Key
  • Play/Pause Key
  • Rewind Key
  • Eject Key
  • Nvidia (using nouveau)
  • Shutdown
  • Colours appear more vivid than my MacBook Pro4,1 (which look washed-out in comparison)
  • Forward Key

What does not work

  • Fan!!! (runs hot, but fan does come on, just not soon enough)
  • Keyboard backlight keys - they bring up OSD but nothing changes
  • Front Left is silent (or is same as Front right)
  • Bluetooth (so far)


What I can't test


  • Firewire - module loaded but where is port?

Now to try a few experimental things


  • Kernel 3.5
  • Nvidia 304 (wasn't actually in used)
  • MacTel macfanctld
Results
  • Front Left speaker now works
  • Close lid to sleep (I forgot to test this with 3.2 kernel)
  • Does not wake when lid opened (although white pulsing light goes out when lid is lifted) - had to force power off

Drop Nvidia 304

Results

  • No change since Nvidia was not being used.


Try Linux Kernel 3.6

I used 3.6 RC3 and64 debs from here: 
http://kernel.ubuntu.com/~kernel-ppa/mainline/v3.6-rc3-quantal/
Install 4.

Results

  • First think I noticed was that my fans turned on!
  • Brightness Keys no longer change brightness
  • Keyboard back-light keys work!


This is looking more positive.


    Tuesday, 20 March 2012

    UPDATE: Howto Restore from a Time Machine backup on a Drobo-FS

    This is what I did. Not everything here may be important, but...

    My Starting point:


    • A PowerBook G4.
    • A probably damaged file system (ie. I could not shrink a partition).
    • A recent Time Machine backup to a Time Machine enabled share on a Drobo-FS. This was 'updated' several times as I was cleaning out my file system. This also meant it is huge.
    • I removed all partitions on my hard drive - I wanted a clean start.

    Note: my Drobo-FS share is accessible by 'Everyone'. My other shares require an account. This may be important as I am not sure if you will later be able to connect to this share by using a username and password. So, I would connect to your Drobo-FS and add 'Everyone' with Read/Write access.

    What I wanted to do was install a tiny OSX partition, restore some of my old accounts, and install linux as well. My aim was to make Linux the main OS.


    Howto Restore from a Time Machine backup on a Drobo-FS


    • Boot of install DVD. Mine was OSX Leopard 10.5
    • After first screen to select your language, turn on AirPort (icon in top right hand corner) and joined your home wireless network.
    • From the menu, select Utilities - we need to somehow find and mount your Drobo-FS share containing your Time Machine backup bundle.
    • Select Disk utility.
    • Select File - Open Disk Image. This will not actually work, but it will allow you to mount a Drobo-FS share. You should now see your Drobo-FS under SHARED in a Finder window.
    • Click on your Drobo-FS. Your shares should be listed.
    • Double-click on your Time Machine backup share. Your Drobo-FS backup share should now be mounted and accessibly for restoration.
    • Cancel back to Disk Utility.
    • Here, I created a Partition and gave it the identical name that it had before. In my case it was 'Macintiosh HD'. This may or may not be important.
    • Exit Disk Utility.
    • Select Utilities - Restore... (not sure exactly what is is called)
    • From here you should be able to select your Time machine backup share and your hard drive for the restore to proceed.

    Note: I had trouble using the wired Ethernet port and enabling AirPort seemed to help - On previous attempts to migrate accounts, I found that Apple's installer could not  use my wired Ethernet port!?!
    Note: This is not what I want, but I hope to be able to shrink this later to add other partitions for Linux.

    Currently mine is up to 96%.

    UPDATE: It did finish and all was well and Linux (Mint PPC) runs great!


    Postscript

    Dear Drobo,

    You market these 'simple-to-use' devices and promote Time Machine compatibility - to a degree.

    I should not have to go to some third party blog that suggests I run a terminal and type in a command that only geeks would know what it does or means. 

    Should I?

    This is your support page. - well, that is what I found. Is that the best you can do?

    UPDATE: Drobo have contacted me and suggest looking at this page.

    http://support.drobo.com/app/answers/detail/a_id/667/kw/restore

    It looks very complicated and they indicate that it only works for Lion or later. 

    I think my 'discovered' method is simpler. Drobo's instructions require terminal commands and details that would be hard to get if you are not familiar with low-level Unix commands and IP networking.

    You now need to publish simple-to-use instructions on how to use Drobo's (especially networked ones) in situations where we, your customer's need instructions.

    Why? Because your products don't 'just work'!!!

    In the case your Drobo-FS product - the one I paid handsomely for on the basis of 'simple-to-use'... you need to publish at least these instructions:


    • Restore a machine from a Time Machine backup on a Drobo-FS share.
    • Migrate accounts at any time or after a fresh install of OS-X.

    You need to test these instructions, try them of all supported OSs, you do do this already don't you? So document it so people can do it for themselves.

    How can I recommend a Drobo-FS to someone when I had so much trouble restoring!?!

    But, if I am the dummy here, please tell me where I went wrong. I have to do this a few more times!